 I had some success with holding the camera lens in front of the
lens of a small digital camera, but it was really hard to keep it all lined up and
focused. So I built this little jig to hold the lens in front of the camera.
I had some success with holding the camera lens in front of the
lens of a small digital camera, but it was really hard to keep it all lined up and
focused. So I built this little jig to hold the lens in front of the camera.
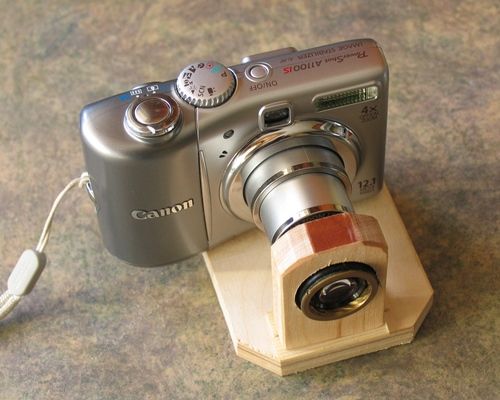
I had some success with holding the camera lens in front of the
lens of a small digital camera, but it was really hard to keep it all lined up and
focused. So I built this little jig to hold the lens in front of the camera.
It consists of a small piece of plywood, screwed to the tripod mount of the camera. On the front is a block of wood with a 1" hole to fit a f/2.8 38 mm lens from an old non-zoom point-and-shoot 35 mm camera. I wrapped a bit of electrical tape around this lens to make it fit snugly in a 1" hole.
The block it's in is attached to the plywood base with just one screw from the bottom. That way I can swivel the lens side-to-side to help align it. There is a wood shim under the block, which I used to get the vertical alignment with my camera's lens barrel just right. Without proper alignment, it's impossible to get the whole frame into focus.
 The lens doesn't move with the zoom of the camera. I mounted it far enough away from the camera
so that the extending zoom lens wouldn't hit it. I have to zoom in by about 2.5x to get
the full frame covered without vignetting in the corners.
The lens doesn't move with the zoom of the camera. I mounted it far enough away from the camera
so that the extending zoom lens wouldn't hit it. I have to zoom in by about 2.5x to get
the full frame covered without vignetting in the corners.
I mounted the lens "backwards" so that what used to be the film side faces the subject. The reason for doing this is that the lens is optimized for the near field on the film side, and for far field on the subject side. When used for macro photography like this, the subject is the near field and the far field is what is then projected into the camera's lens. The digital camera is also optimized for far field on the subject side, so it all works out.
It's common to flip the lens this way when doing macro photography. I used to think this was hocus-pocus, but flipping the lens to make the film side face the subject really did improve edge to edge sharpness - that is, as long as my subject is flat.

 The "heads" side of a Canadian penny. It looks scuffed up close up, but it was actually
a penny that still looked shiny and new at first glance.
The "heads" side of a Canadian penny. It looks scuffed up close up, but it was actually
a penny that still looked shiny and new at first glance.
With the magnification from the 38 mm camera lens, the maximum area I can cover is a circle the size of a penny - 19 mm in diameter. Typically, though, I zoom the zoom lens in a 4x. At that zoom level, I get an image that is 1 cm across full frame, with no vignetting.
Its still possible to get sharp photos hand held at that zoom level. The photo at left was taken hand-held. The key is to support your hand on the table at the same time and lots of light.
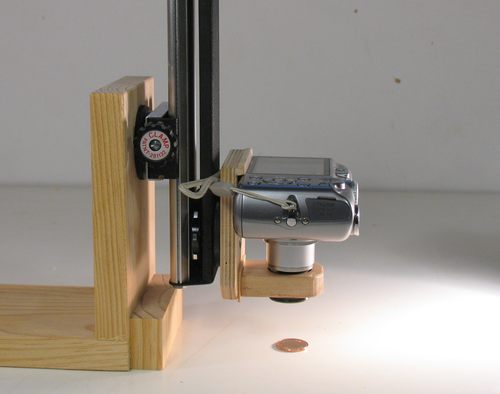 I remembered I had this old macro focusing rail that I had never used.
I built a simple wooden stand for it, and it makes framing and focusing the image much easier.
I remembered I had this old macro focusing rail that I had never used.
I built a simple wooden stand for it, and it makes framing and focusing the image much easier.

 I wanted to see if I could get even more magnification. I have an old lens from an 8 mm movie camera
with about a 13 mm focal length. I wanted to keep this lens as close to the camera's lens as possible,
closer than I could with my other lens holder. So I came up with a sort of lens cap to hold the lens
onto my digital camera. With this setup at full zoom a 5 mm of subject covers the full frame of the camera.
At that magnification the subject image is actually projected slightly larger than 1:1
onto the camera's tiny sensor.
I wanted to see if I could get even more magnification. I have an old lens from an 8 mm movie camera
with about a 13 mm focal length. I wanted to keep this lens as close to the camera's lens as possible,
closer than I could with my other lens holder. So I came up with a sort of lens cap to hold the lens
onto my digital camera. With this setup at full zoom a 5 mm of subject covers the full frame of the camera.
At that magnification the subject image is actually projected slightly larger than 1:1
onto the camera's tiny sensor.
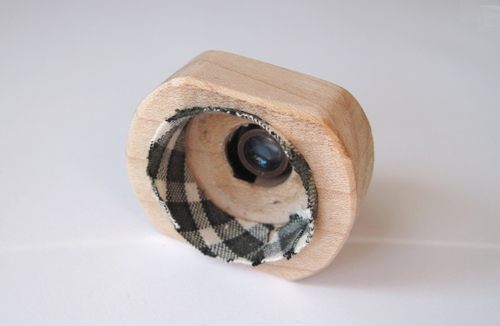 My "lens cap" is a block of maple with a 1 1/8" (28.5 mm) hole drilled in the back. The front-most
section of the lens barrel of my camera is 27.5 mm in diameter. So I glued some cloth on the
inside of the hole to take up the slack. The cloth makes the cap fit with just enough friction
to hold it onto the lens barrel. The fit is still loose enough that if the camera retracts
its lens, the lens just pulls itself out of the cap, so no damage is done.
My "lens cap" is a block of maple with a 1 1/8" (28.5 mm) hole drilled in the back. The front-most
section of the lens barrel of my camera is 27.5 mm in diameter. So I glued some cloth on the
inside of the hole to take up the slack. The cloth makes the cap fit with just enough friction
to hold it onto the lens barrel. The fit is still loose enough that if the camera retracts
its lens, the lens just pulls itself out of the cap, so no damage is done.
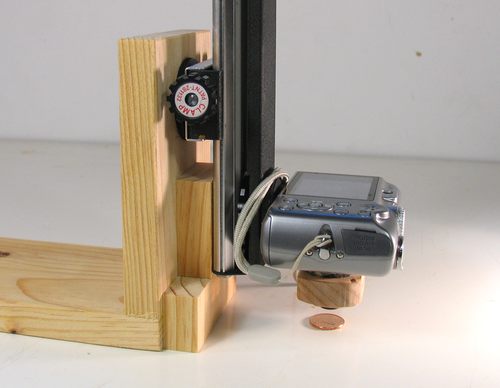 With the greater magnification of the 8 mm lens, its no longer practical to take images freehand, and
the focusing rail becomes vital.
With the greater magnification of the 8 mm lens, its no longer practical to take images freehand, and
the focusing rail becomes vital.
The catch is, just pushing the shutter button moves the camera around a little, so ideally, I'd have some sort of cable release for the camera. I couldn't use the camera's self timer because in self-timer mode, the camera focuses at the time the shutter button is pushed. Removing my hands from the camera causes enough movement to throw the image out of focus.
I contemplated figuring out if I could operate the camera over USB, but that would require installing the awful software that comes with the camera and having a computer hooked up whenever I'm taking macro photos.
I found a better solution - put the camera in "macro" mode, and then just tap the shutter button all the way through. Not a half-way press for pre-focus and then through press, but a single tap fully down. With the increased shutter lag, and a simple sturdy stand, the camera shake has settled by the time the camera is ready to take its picture.
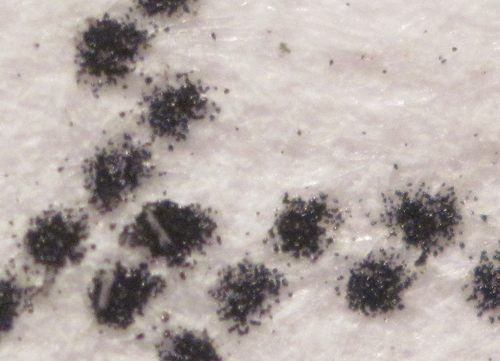 Here is a crop of a photo of some laser printer output taken with this setup.
Its not as sharp as the camera is capable of, so I think my 8 mm movie camera lens is less than ideal.
Then again, those old 8 mm movies never were that sharp, so this isn't a surprise.
Here is a crop of a photo of some laser printer output taken with this setup.
Its not as sharp as the camera is capable of, so I think my 8 mm movie camera lens is less than ideal.
Then again, those old 8 mm movies never were that sharp, so this isn't a surprise.
The image is one millimeter wide, and the large dots are part of a half-tone line. They are 0.25 mm apart. I can barely see that these are individual dots with the naked eye.
Each pixel of this image is two microns. The pixels are a bit fuzzy, but I'm pretty sure the smallest of the black toner particles are about two pixels in size. Two pixels would be four microns. Airborne particulate less than 5 microns in size doesn't get filtered out by the nose and airways and can get deep into the lungs. Of course, the toner is bonded to the paper, but I'm sure some of it gets airborne. This why photocopiers and laser printer particle emissions are considered a minor health hazard these days. Something to consider if you refill your toner cartridges from a bottle!
 Examining glue failures
 Examining carbide teeth
 Examining shop dust particle size
 Night time photography
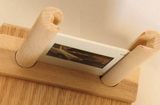 Slide photographing jig
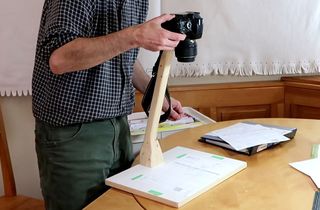 Document photographing stand
 Photographing wood grain through a microscope lens
 Best camera for YouTube videos?
 LED vs CF colour spectrum
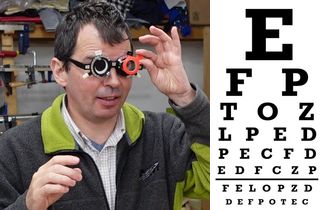 Do your own eye exam, derive your Rx