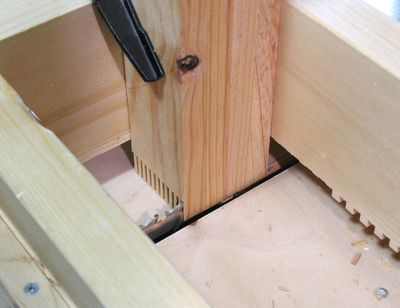
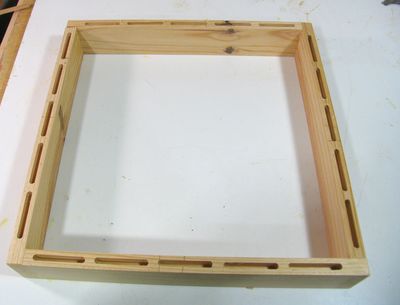
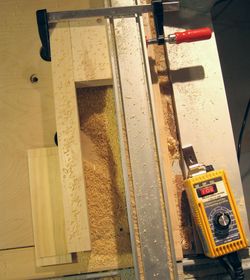
 The core of the design consists of an upper and a lower frame. The frames are finger
jointed together at the corners using my
box joint jig. My sawblade has a 2.5 mm kerf,
and so I made my cuts, and my fingers, to be that width.
The core of the design consists of an upper and a lower frame. The frames are finger
jointed together at the corners using my
box joint jig. My sawblade has a 2.5 mm kerf,
and so I made my cuts, and my fingers, to be that width.
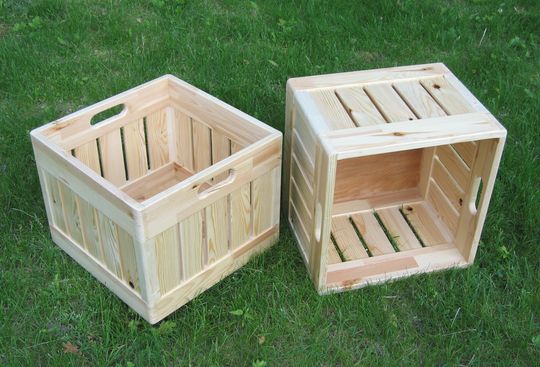
I have two milk crates that were left behind by students years ago. Over the years, I have found a lot of uses for these milk crates - far more uses than I have crates for. So I decided to build some milk crate inspired wooden boxes to use as a substitute.
Of course, one of the advantages of milk crates is that they are cheap. Although my boxes cost me very little in materials, the time involved is perhaps a bit much to justify. But still, I think my boxes preserve the spirit of a milk crate, while being sturdier and nicer to look at.
The core of the design consists of an upper and a lower frame. The frames are finger
jointed together at the corners using my
box joint jig. My sawblade has a 2.5 mm kerf,
and so I made my cuts, and my fingers, to be that width.
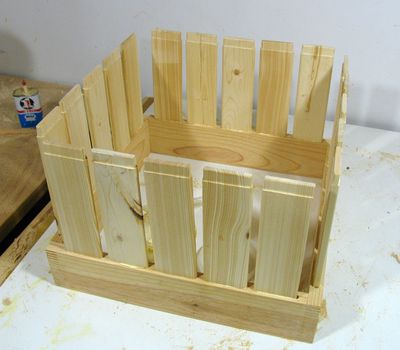
 I used my mortising machine to cut five 1/4" wide mortises for the slats along the edges
of the frame pieces. With five slats along each edge, four sides, on the top and bottom,
that made for a total of 40 mortises
for each box. I clamped a block of wood to the table to act as a stop for where to
place the work piece, so that I didn't have to measure each piece as I clamped it onto
the table to cut the mortises.
I used my mortising machine to cut five 1/4" wide mortises for the slats along the edges
of the frame pieces. With five slats along each edge, four sides, on the top and bottom,
that made for a total of 40 mortises
for each box. I clamped a block of wood to the table to act as a stop for where to
place the work piece, so that I didn't have to measure each piece as I clamped it onto
the table to cut the mortises.
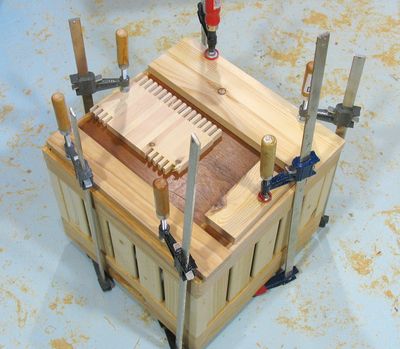
 Next I glued the fingerjoints together. I made a little comb to help me get the glue
between the fingers. I dipped the fingers of this comb in glue to pick up glue, and then
just spread it between the fingers of the joint.
Next I glued the fingerjoints together. I made a little comb to help me get the glue
between the fingers. I dipped the fingers of this comb in glue to pick up glue, and then
just spread it between the fingers of the joint.
I made the comb by cutting fingers in a thin piece of hardwood, and then cutting the fingers again, but offset by half a millimeter. That way, the comb's fingers are narrow enough that they won't get stuck between the frame's fingers.
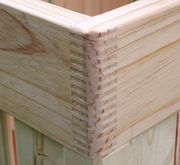
At left is the bottom frame, with its 20 mortises, ready to receive the slats.
To make the vertical slats for the boxes, I used 2x6 lumber, and ripped it down the middle. With the resulting piece being 38 x 60 mm, I was able to resaw three slats out of this by putting the piece upright on the table saw, and cutting in from both side using a very thin skillsaw blade. After planing, I still had slats that were 10 mm thick.
 Next I tenoned the ends of the slats to be 1/4" thick, to go into the slots I cut into
the frame.
Next I tenoned the ends of the slats to be 1/4" thick, to go into the slots I cut into
the frame.
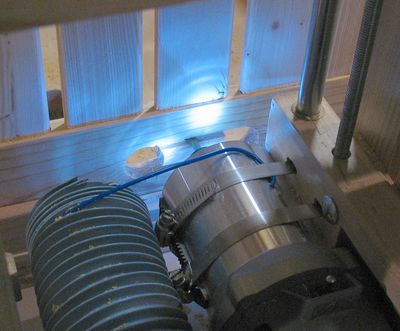
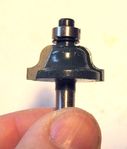 A small Roman Ogee bit, part of a typical inexpensive set of router bits,
can be used as a 1/8" diameter quarter rounding bit, if used with the fence set to
only expose the outer part of the bit.
A small Roman Ogee bit, part of a typical inexpensive set of router bits,
can be used as a 1/8" diameter quarter rounding bit, if used with the fence set to
only expose the outer part of the bit.
|
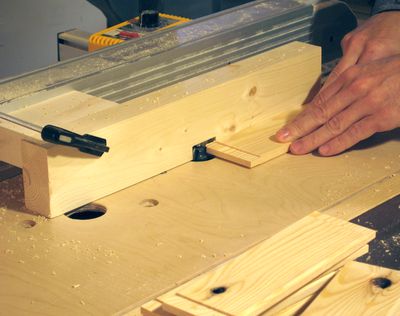 I also rounded the edges of the slats using my router. I used the inside round of an ogee
 router bit to get about a 3 mm (1/8") radius of cut. I rounded all the edges, except for the edges
of the slats towards the corners. These I left square to allow me to glue the corner pieces
to them later.
router bit to get about a 3 mm (1/8") radius of cut. I rounded all the edges, except for the edges
of the slats towards the corners. These I left square to allow me to glue the corner pieces
to them later.
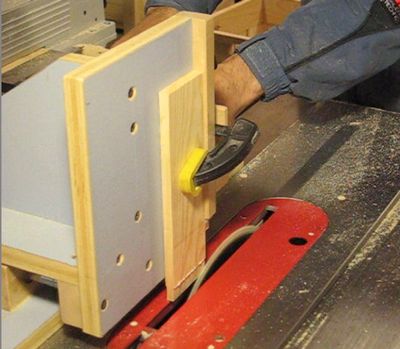
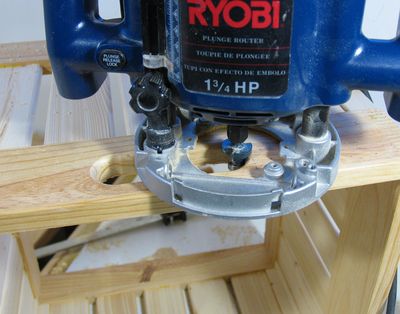
This was before I built my router table, so I just mounted the router on my right side table saw extension, and made a temporary fence, offset from the saw's fence, so that the wood chips would have somewhere to go.
 Gluing the slats into the bottom frame is easy, because they can be glued in one at a time.
But gluing the top frame on is tricky, because glue has to be applied to all the slats and mortises, and then all the slats have to be aligned with their respective mortises in a timely fashion before the glue gets firm. And in tightly fitting joints, the glue goes firm awfully quickly.
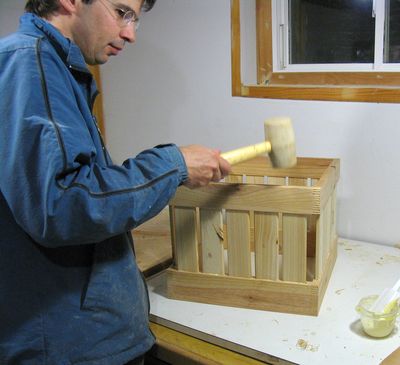 Its best to put some strong clamps, and a rubber mallet within easy reach before starting
the final glue up. Once you get to the point where you can't push it together any further by hand,
you have to budge it quickly before the glue gets really firm. I just ended up whacking it
together with a rubber mallet. Its best to pound on the bottom of the box,
so any hammer marks will be on the bottom, not the top!
Its best to put some strong clamps, and a rubber mallet within easy reach before starting
the final glue up. Once you get to the point where you can't push it together any further by hand,
you have to budge it quickly before the glue gets really firm. I just ended up whacking it
together with a rubber mallet. Its best to pound on the bottom of the box,
so any hammer marks will be on the bottom, not the top!
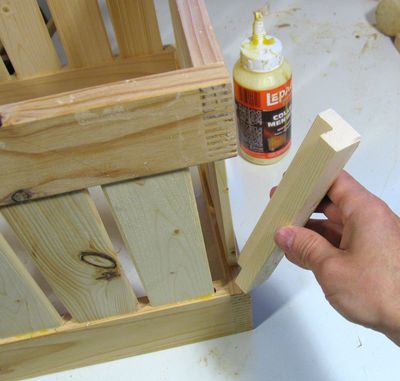 I added these L-shaped pieces to the corners. They are glued against the adjoining slats. I didn't
round the edges of the slats facing the corners to leave more gluing surface.
The piece is also butt joined to the top and bottom frame - I cut them to length to fit exactly,
so the L shaped pieces touch both the top and bottom frames.
I added these L-shaped pieces to the corners. They are glued against the adjoining slats. I didn't
round the edges of the slats facing the corners to leave more gluing surface.
The piece is also butt joined to the top and bottom frame - I cut them to length to fit exactly,
so the L shaped pieces touch both the top and bottom frames.
The corners aren't really there to hold the box together, more to keep long items from poking out of a gap in the corner of the box. My original idea was to make the slats extend to the corners, but that would have been tricky in terms of all the alignment, especially while pounding the whole thing together. Plus, I think these bigger corner pieces look better
 For the handle holes, I drilled two 1.25" holes into the top frame. To cut between them,
I just used the 1/4" router bit that I already had in my mortising machine, and essentially
cut two through mortises for the straigh cuts between the two holes. Having built the
mortising machine only recently, I keep
thinking of new ways to make use of it.
For the handle holes, I drilled two 1.25" holes into the top frame. To cut between them,
I just used the 1/4" router bit that I already had in my mortising machine, and essentially
cut two through mortises for the straigh cuts between the two holes. Having built the
mortising machine only recently, I keep
thinking of new ways to make use of it.
 I rounded the inside edges of the handles with a 1/4" radius router bit, so the handles
would feel more comfortable to hold.
I rounded the inside edges of the handles with a 1/4" radius router bit, so the handles
would feel more comfortable to hold.
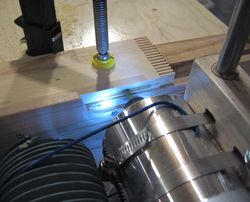
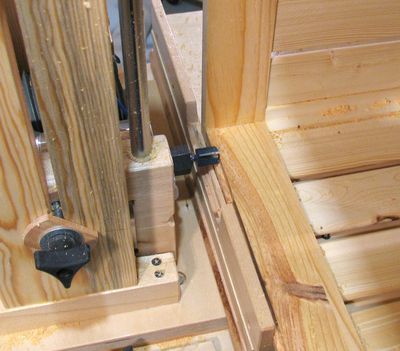 Next, I cut a rabbet on the inside edge of the box. I once again used my slot mortising
machine, but this time just using it as a horizontal router table. I fixed the router
in place, and just slid the box along.
Next, I cut a rabbet on the inside edge of the box. I once again used my slot mortising
machine, but this time just using it as a horizontal router table. I fixed the router
in place, and just slid the box along.
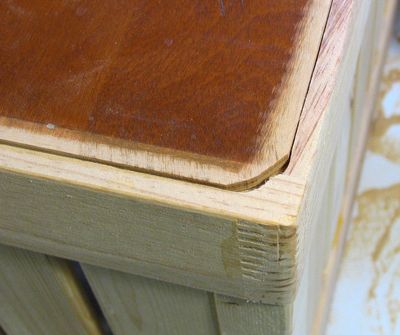 I didn't route all the way into the corners, to keep more of the box joint intact, and
just rounded the corners of the bottoms of the boxes a little bit to accommodate.
I didn't route all the way into the corners, to keep more of the box joint intact, and
just rounded the corners of the bottoms of the boxes a little bit to accommodate.
The bottom for this box is actually a piece of recycled plywood, which is why the middle of it is stained.
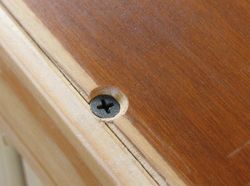 I first just glued the bottom in place. For drawers, I rely on just the glue to hold the
bottom on. But these milk crate boxes might potentially get abused and filled with
rocks or something like that. So just to be safe, I decided to reinforce the bottom with
two screws along each edge.
I first just glued the bottom in place. For drawers, I rely on just the glue to hold the
bottom on. But these milk crate boxes might potentially get abused and filled with
rocks or something like that. So just to be safe, I decided to reinforce the bottom with
two screws along each edge.
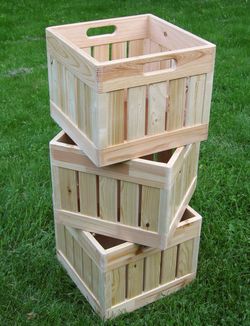
The milk crate boxes turned out to be quite a lot of work to build. So I probably won't be using them as a step stool while painting walls, or for propping up large pieces while varnishing either. They just look too nice for that.
But overall, I think crates like that could be useful in a decorating kind of way - if you want to achieve the hip-ness of the bohemian look of milk crates, without the poor and grunge factor that tends to go with them. They might make nice bedside tables for a loft, for example.
 More about Box joints (2009)
 Homemade slot mortiser (2009)
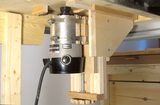 Wooden Router lift (2009)
 Basement storage solution (2003)
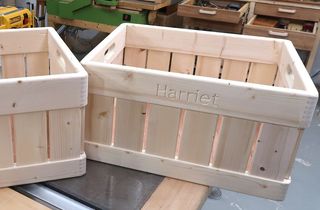 Building my milk crate inspired boxes -- again
 Building a simple table
 Kitchen cabinet organizer boxes
 Small keepsake box with the pantorouter
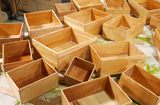 Small box joined boxes
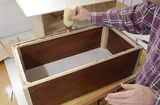 Storage box from
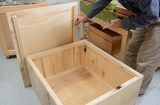 Building a shipping crate