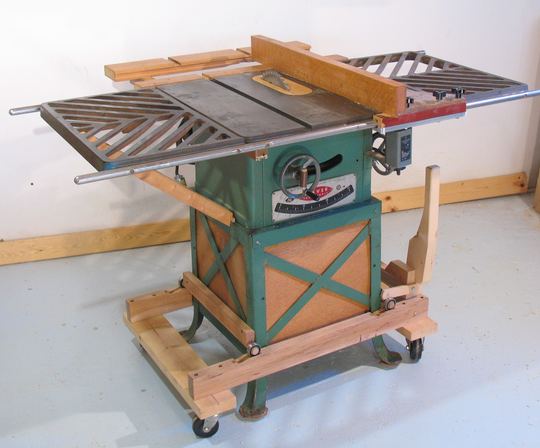
When I moved my old table saw into my new
workshop,
I didn't really have a good place to set it up, seeing that my
new table saw
was already in the center of my workshop. I experimented a bit with
workshop layouts before I decided to put my old table saw on wheels so I could roll it out of the way.
But I also still wanted the saw to solidly stand on its own legs when I was
actually using it. So I had to come up with some sort of tool base with a lifting mechanism that
would lift the saw off its own legs and onto the wheels whenever I wanted to move it.
In addition, I didn't want the base to get in the way of my toes when standing directly
in front of the saw. So with the legs being shaped the way they are, a traditional
mobile base would have really gotten in the way.
I thought of all kinds of complicated arrangements of levers and such to lift the saw.
The challenge being to lift both sides of the saw with one lever movement, and to get a mechanism that
was sturdy enough, and with enough mechanical advantage to lift he heavy saw with
little effort.
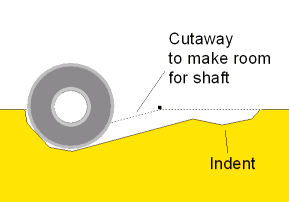
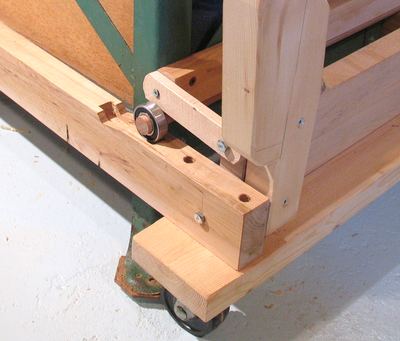
What I finally came up with was to lift the saw via the action of some ball bearing races
rolling in an inclined slot.
The saw itself would be moved side to side on the mobile base, to roll it up the inclined slots
and thus lift it off its feet.
Seeing that the mobile base was already on wheels, I wasn't too concerned about having
to slide the saw along the floor while lifting, because as long as the saw is still
in contact with the floor, the mobile base, being on wheels, just rolls along, until
the saw is off the floor.
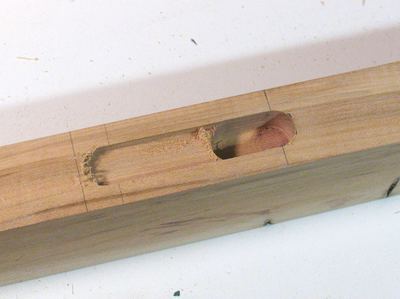
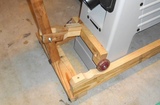
I cut the slots in the maple cross-pieces with a router for the initial cut, then
chiseled it out to its final shape. That way, I had a consistent starting point to
start my chiseling with, to make sure they'd all be roughly the same.
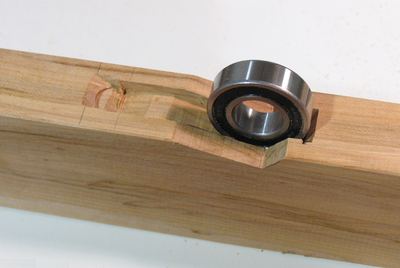
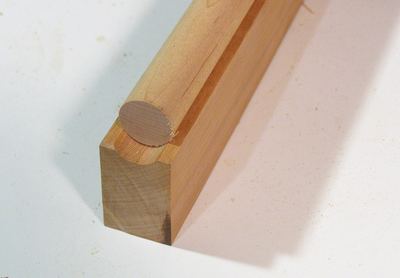
I also ended up having to cut a notch into the wood, so that the dowel, going
through the ball bearing, would not hit the wood (see photo above)
I used ball bearings with a 3/4" shaft hole. I figured I could get away with just a dowel
going through the bearing to hold up the saw, as long as the dowel didn't extend too
far to the bearings unsupported.
Steel shafts would have been better, but with dowels so much cheaper than steel, and so much
easier to work with, I just figured I'd use dowels, and replace them with steel if they ever broke.
To help hold the dowel, I cut a cove in a piece of wood
to approximate roughly a 3/4" diameter round. I suppose I could have used ball nose router bit
for this cut, but it was quicker to set up a cove cut. I then glued the dowels onto
the supporting pieces, with the dowel only extending about 4 cm past the wood. In retrospect
I could have made the support pieces extend right up to the bearing for even more sturdiness.
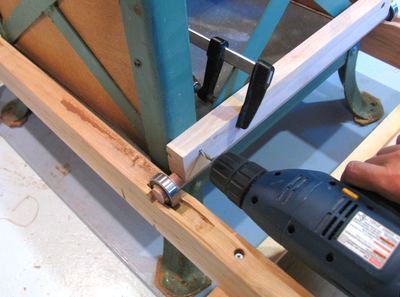
To get the holes aligned just right, I assembled the frame of the base, and put the
ball bearings, and dowels on, to see where it would go. I then just drilled through
the wood, and the frame of the saw to mount it.
With the base of my saw being made of individual pieces of angle iron, they were thick enough
that I could then just take a large sheet metal screw, whose major thread diameter was just
slightly larger than the hole I drilled, and force it to thread into the angle iron of the saw.
If the base were made of sheet metal, I would have had to use more screws.
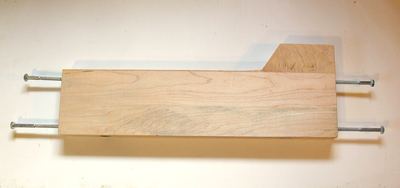
To move the saw side to side up and down the incline, I first was going to just pull it in the
middle. But then I realized that the saw is actually heavier on the back, and
unless I pulled it aligned with its center of gravity, it was liable to try to twist in the
base. So I decided to make a bar that would pull on both sides, and prevent the saw from
twisting. The piece shown at left is the part that pulls on both sides. The two screws further
down go through the frame of the base, while the two shorter screws attach to individual levers
that go to the saw. The wider part to the left is to provide a better place to attach the lever.
I had actually contemplated using hinges instead of just a big screw turning in wooden holes,
but the whole thing would have required six hinges, and would have been a lot of work to mount.
So I settled for the big screws going through holes in the wood to hinge the mechanism on.
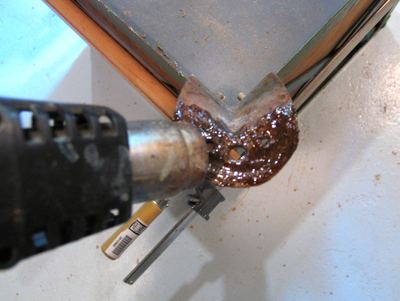
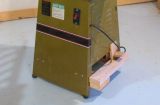
Because its easy to chip the paint off the concrete floor in my workshop, I also glued pieces
of masonite to the bottom of the table legs to act as a bit of padding. I hot glued these onto
the bottom of the legs. A hot glue gun doesn't provide nearly enough heat to actually make
a good bond with the cold metal, so I used a heat gun to heat up the legs enough that I could
just melt the glue sticks on them directly. After getting enough glue onto the
bottoms of the legs, I just pressed the piece of masonite onto the hot glue.
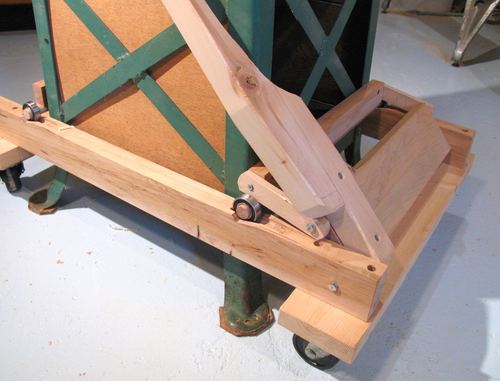
And finally, with the mechanism all put together. This is with the mechanism in the "up" position.
With the slot having a slight indentation near the top, the mechanism stays up on its own,
even while the saw is rolled around the workshop.
You can just see a bit of a shadow under the leg of the saw. The legs only lift about 5 mm off
the floor. One thing I messed up with a little bit was that in the up position, the wheels
would hit the saw's legs if they happend to be swiveled towards the saw. So I mounted the wheels slightly
differently to give just enough clearance.
On the other side of the base, this is was not an issue, because the wheels don't need to roll and
swivel freely while the saw is in the 'down' position. Especially because the act of lowering the
saw tends to swivel the wheels away from the legs anyway.
And here's the mechanism in the down position. You can see the odd shape I cut for the lever,
which passes in front of the saw while in the down position. That way, it doesn't get in
the way of the crank on the right for tilting the blade. The lever is also short enough not to
interfere with the up/down crank on the front of the saw.
And finally, a short video demonstrating the mobile base:
 I thought of all kinds of complicated arrangements of levers and such to lift the saw.
The challenge being to lift both sides of the saw with one lever movement, and to get a mechanism that
was sturdy enough, and with enough mechanical advantage to lift he heavy saw with
little effort.
I thought of all kinds of complicated arrangements of levers and such to lift the saw.
The challenge being to lift both sides of the saw with one lever movement, and to get a mechanism that
was sturdy enough, and with enough mechanical advantage to lift he heavy saw with
little effort.
 What I finally came up with was to lift the saw via the action of some ball bearing races
rolling in an inclined slot.
What I finally came up with was to lift the saw via the action of some ball bearing races
rolling in an inclined slot.
 I cut the slots in the maple cross-pieces with a router for the initial cut, then
chiseled it out to its final shape. That way, I had a consistent starting point to
start my chiseling with, to make sure they'd all be roughly the same.
I cut the slots in the maple cross-pieces with a router for the initial cut, then
chiseled it out to its final shape. That way, I had a consistent starting point to
start my chiseling with, to make sure they'd all be roughly the same.
 I used ball bearings with a 3/4" shaft hole. I figured I could get away with just a dowel
going through the bearing to hold up the saw, as long as the dowel didn't extend too
far to the bearings unsupported.
Steel shafts would have been better, but with dowels so much cheaper than steel, and so much
easier to work with, I just figured I'd use dowels, and replace them with steel if they ever broke.
I used ball bearings with a 3/4" shaft hole. I figured I could get away with just a dowel
going through the bearing to hold up the saw, as long as the dowel didn't extend too
far to the bearings unsupported.
Steel shafts would have been better, but with dowels so much cheaper than steel, and so much
easier to work with, I just figured I'd use dowels, and replace them with steel if they ever broke.
 To get the holes aligned just right, I assembled the frame of the base, and put the
ball bearings, and dowels on, to see where it would go. I then just drilled through
the wood, and the frame of the saw to mount it.
To get the holes aligned just right, I assembled the frame of the base, and put the
ball bearings, and dowels on, to see where it would go. I then just drilled through
the wood, and the frame of the saw to mount it.
 To move the saw side to side up and down the incline, I first was going to just pull it in the
middle. But then I realized that the saw is actually heavier on the back, and
unless I pulled it aligned with its center of gravity, it was liable to try to twist in the
base. So I decided to make a bar that would pull on both sides, and prevent the saw from
twisting. The piece shown at left is the part that pulls on both sides. The two screws further
down go through the frame of the base, while the two shorter screws attach to individual levers
that go to the saw. The wider part to the left is to provide a better place to attach the lever.
To move the saw side to side up and down the incline, I first was going to just pull it in the
middle. But then I realized that the saw is actually heavier on the back, and
unless I pulled it aligned with its center of gravity, it was liable to try to twist in the
base. So I decided to make a bar that would pull on both sides, and prevent the saw from
twisting. The piece shown at left is the part that pulls on both sides. The two screws further
down go through the frame of the base, while the two shorter screws attach to individual levers
that go to the saw. The wider part to the left is to provide a better place to attach the lever.
 Because its easy to chip the paint off the concrete floor in my workshop, I also glued pieces
of masonite to the bottom of the table legs to act as a bit of padding. I hot glued these onto
the bottom of the legs. A hot glue gun doesn't provide nearly enough heat to actually make
a good bond with the cold metal, so I used a heat gun to heat up the legs enough that I could
just melt the glue sticks on them directly. After getting enough glue onto the
bottoms of the legs, I just pressed the piece of masonite onto the hot glue.
Because its easy to chip the paint off the concrete floor in my workshop, I also glued pieces
of masonite to the bottom of the table legs to act as a bit of padding. I hot glued these onto
the bottom of the legs. A hot glue gun doesn't provide nearly enough heat to actually make
a good bond with the cold metal, so I used a heat gun to heat up the legs enough that I could
just melt the glue sticks on them directly. After getting enough glue onto the
bottoms of the legs, I just pressed the piece of masonite onto the hot glue.
 And finally, with the mechanism all put together. This is with the mechanism in the "up" position.
With the slot having a slight indentation near the top, the mechanism stays up on its own,
even while the saw is rolled around the workshop.
And finally, with the mechanism all put together. This is with the mechanism in the "up" position.
With the slot having a slight indentation near the top, the mechanism stays up on its own,
even while the saw is rolled around the workshop.
 And here's the mechanism in the down position. You can see the odd shape I cut for the lever,
which passes in front of the saw while in the down position. That way, it doesn't get in
the way of the crank on the right for tilting the blade. The lever is also short enough not to
interfere with the up/down crank on the front of the saw.
And here's the mechanism in the down position. You can see the odd shape I cut for the lever,
which passes in front of the saw while in the down position. That way, it doesn't get in
the way of the crank on the right for tilting the blade. The lever is also short enough not to
interfere with the up/down crank on the front of the saw.
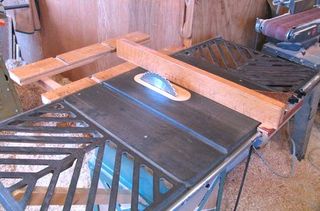
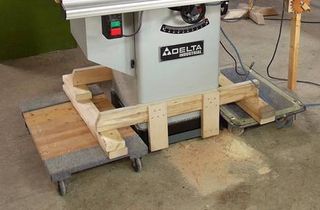 Table saw mover using dollies
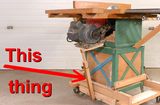 Contractor saw vibration dampener
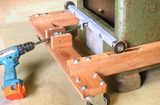
 Mobile jointer base
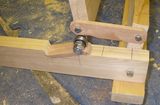
 Shawn's jointer base
 Welding cart from an