Router lift
I never used my router very much, but maybe that's because it was always
a little inconvenient to set up. So I figured if I permanently mounted a
router in a router lift, I might use it more.
But commercial router lifts cost several times as much as a cheap router.
So I designed and built my own.
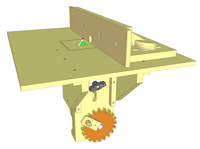
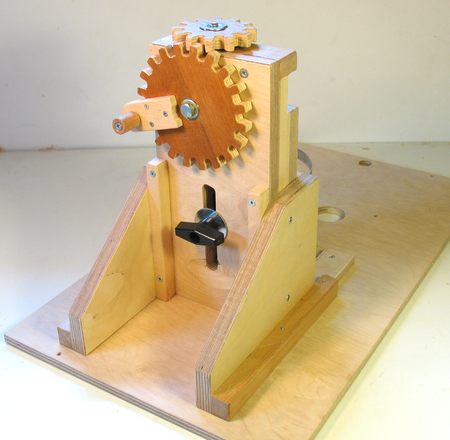
The fact that this router lift is operated with a conveniently located crank under
the table does, I think, make it more convenient to use than a lot of commercial router
lifts.
 Naturally, I built it out of wood. Even the slides are out of wood on this one.
I had briefly considered using steel shafts and bronze sleeves, like I did
on my tenon jig or my
slot mortiser. But to make this work well, I would realistically need two
parallel steel shafts, and sleeves. Getting the alignment right on all that
would have been very difficult. I also considered modified drawer slides
like on my slot mortiser, but I would have had to shorten these by a lot to fit
in the space that I had. That, and I couldn't think of a good way of protecting them
from the sawdust.
Naturally, I built it out of wood. Even the slides are out of wood on this one.
I had briefly considered using steel shafts and bronze sleeves, like I did
on my tenon jig or my
slot mortiser. But to make this work well, I would realistically need two
parallel steel shafts, and sleeves. Getting the alignment right on all that
would have been very difficult. I also considered modified drawer slides
like on my slot mortiser, but I would have had to shorten these by a lot to fit
in the space that I had. That, and I couldn't think of a good way of protecting them
from the sawdust.
So I made the slides out of wood this time. The rationale was that I'd make
vertical adjustments only during setup, and not during actual operation.
That, and repeatability and potential play were less critical than in my
other machines.
 An obvious choice would have been dovetail guides, and I even went so far
as to cut the dovetail guides before I changed my mind.
An obvious choice would have been dovetail guides, and I even went so far
as to cut the dovetail guides before I changed my mind.
The reason I didn't use dovetails is that its harder to get the precision bang on.
I also couldn't think of a good way of tightening and locking the dovetails without putting the
locking knob on the side of the lift. I wanted both the adjustment crank and locking knob
on the same side of my router lift. So instead of dovetails, I made square guide rails.
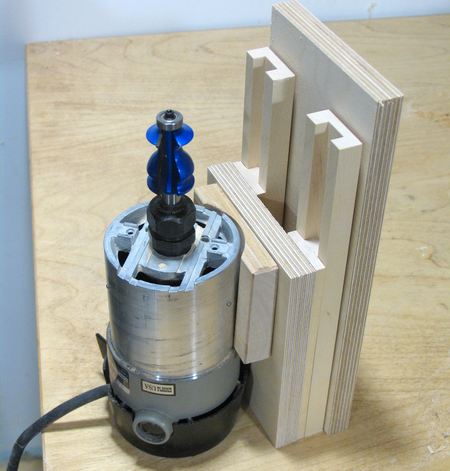
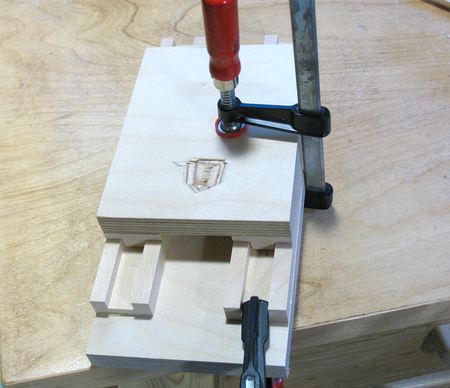
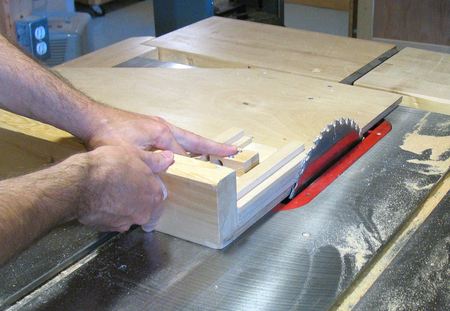
This photo shows a test arrangement of the parts just after I had cut them. Nothing is
fastened in any way.
 I tried to make the square slides super precise. Because I only needed to make a few of these,
I could just cut and check, move the fence by a few thou, and cut again until I had
just the right fit. I ended up having about .005" (.12 mm) of total play. That's actually
less play than the plunge base on my cheap router. I never like how much play these plunge
bases have. Even more expensive routers have considerable play in the plunge mechanism.
I tried to make the square slides super precise. Because I only needed to make a few of these,
I could just cut and check, move the fence by a few thou, and cut again until I had
just the right fit. I ended up having about .005" (.12 mm) of total play. That's actually
less play than the plunge base on my cheap router. I never like how much play these plunge
bases have. Even more expensive routers have considerable play in the plunge mechanism.
 With the rails having so little tolerance, its important to get them exactly parallel.
I glued the two rails onto the top part, with spacers in between the rails while
gluing to ensure the rails were exactly parallel. Then, I glued one rail to the bottom
part and , let the glue dry. To glue the last rail in alignment, I used the top part
as a guide to hold the second rail in place, and clamped it together while the glue set.
This worked out pretty well. The two parts slid easily, but had no noticeable play.
Humidity changes might warp it still. But I used plywood to span the two rails, and
plywood is much less prone to warping from humidity changes. For the rails themselves,
I used the hardest maple that I had kicking around.
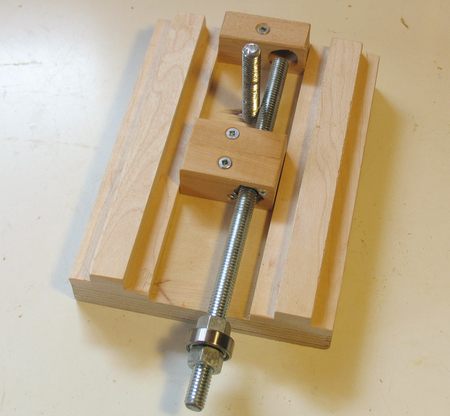 In the sliding part, I mounted a block with a nut in it. When the threaded rod turns,
it moves this nut up and down, which moves the block and the router attached to it
up and down.
In the sliding part, I mounted a block with a nut in it. When the threaded rod turns,
it moves this nut up and down, which moves the block and the router attached to it
up and down.
As you can see, the threaded rod just barely clears the bolt in this block. This bolt
is for locking the router lift in place.
You can also see a block towards the end of the threaded rod. This block fills the
gap between the block and the rail it slides on. I figure it would only be natural
for wood shavings to fall down into that space, where they'd be very difficult
to get back out. So hopefully, the block will prevent this. The block has a blind
hole in it so that the end of the threaded rod can protrude into it when the
router is all the way down.
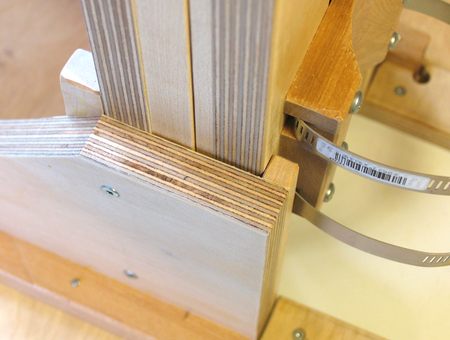
 A bolt from the block that slides protrudes through the fixed slide. A slot along
the slide allows this bolt to pass through the slide. When the locking knob on
this bolt is tightened, the sliding block is firmly pressed against the slide,
which locks the block in place.
A bolt from the block that slides protrudes through the fixed slide. A slot along
the slide allows this bolt to pass through the slide. When the locking knob on
this bolt is tightened, the sliding block is firmly pressed against the slide,
which locks the block in place.
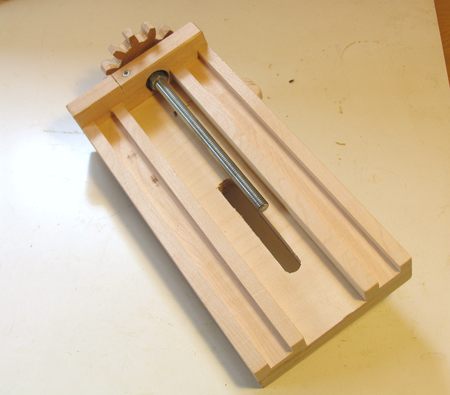
I also made a block to fit at the end
of the slide, which clamps a ball bearing through which the threaded rod is mounted.
A gear on the end of the threaded rod meshes with another gear, at a right angle
to it, with a crank on it. That way, it's easier to crank the router
up and down, without having to reach under. The gearing approach I used is
very similar to the one I used on my box joint jig
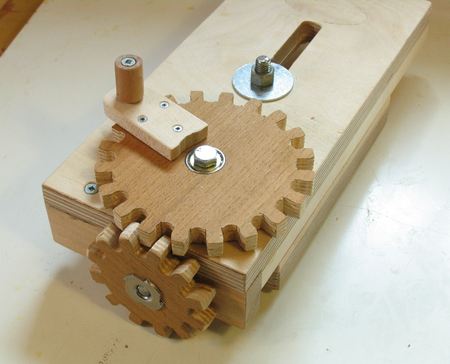 My gear ratio is 20:12. With 16 turns per inch on the rod, I get 9.6 turns per
inch. So it takes fewer turns to lift the router.
My gear ratio is 20:12. With 16 turns per inch on the rod, I get 9.6 turns per
inch. So it takes fewer turns to lift the router.
Originally, I was planning on making the gear ratio 24:12, but then the gear would
have interfered with the locking nut or knob on the vertical adjustment, so I had
to settle for a slightly smaller gear ratio. I could have avoided this problem if
I had made the router lift a little longer. But if my router lift reached down
much further, it would end up hitting the scrap-wood bin that I keep under the
table saw.
 I had recently bought a roll of "UHMW" tape. UHMW tape is meant to be used to make
surfaces more slippery. I stuck some pieces of this tape against the back of
my crank gear, which allows it to slide more easily against the plywood it's mounted to.
I even put a ball bearing in the middle of the gear. This is overkill, but
I had recently dismantled some old rollerblade skates, and the ball bearings
for that were just the right size - although with a 8 mm hole, they are too small
to use on a 3/8" threaded rod, unfortunately.
I had recently bought a roll of "UHMW" tape. UHMW tape is meant to be used to make
surfaces more slippery. I stuck some pieces of this tape against the back of
my crank gear, which allows it to slide more easily against the plywood it's mounted to.
I even put a ball bearing in the middle of the gear. This is overkill, but
I had recently dismantled some old rollerblade skates, and the ball bearings
for that were just the right size - although with a 8 mm hole, they are too small
to use on a 3/8" threaded rod, unfortunately.
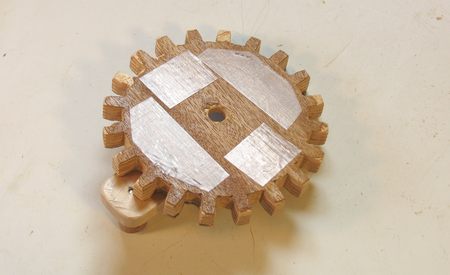
 To mount the router, I cut a cove into a piece of maple. I used a 7 1/4" blade
and set the miter gauge at 40 degrees to cut a cove
that matches the 3.5" diameter of my router very closely.
To mount the router, I cut a cove into a piece of maple. I used a 7 1/4" blade
and set the miter gauge at 40 degrees to cut a cove
that matches the 3.5" diameter of my router very closely.
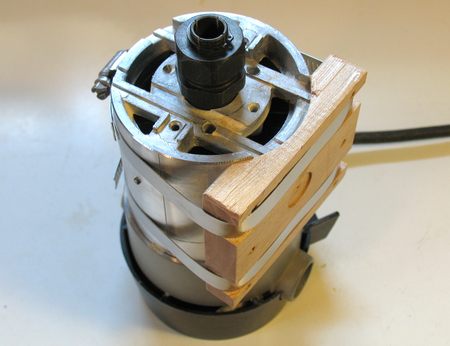 The router is held onto the mount with hose clamps. The hose clamps
pass through shallow dados cut into the back of the mounting block, so that
I can still screw it flush against the plywood. I also cut out
round-ish notches at the corners so that I wouldn't end up having to put
sharp kinks into the hose clamps.
The router is held onto the mount with hose clamps. The hose clamps
pass through shallow dados cut into the back of the mounting block, so that
I can still screw it flush against the plywood. I also cut out
round-ish notches at the corners so that I wouldn't end up having to put
sharp kinks into the hose clamps.
The router does obstruct the block's mounting screws, so the block, together
with the hose clamps has to be mounted onto the router lift, before the
router is installed.
 To mount the rail that the router mount slides up and down on, I attached two
pieces of plywood to either side of the slider.
To mount the rail that the router mount slides up and down on, I attached two
pieces of plywood to either side of the slider.
I also added a bit of a lip to the front of the side brackets, so that
the sliding part is held against the rail even if the locking knob were completely
removed.
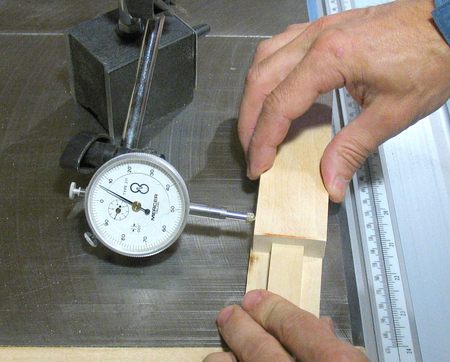
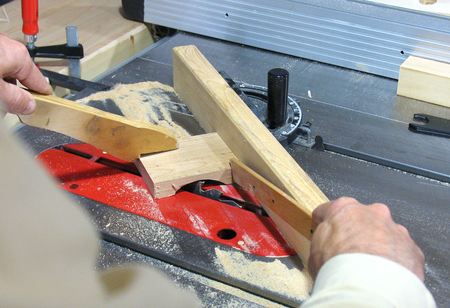
 I had cut the block that slides to exactly the same width as the rail,
so I trimmed a millimeter off it with the table saw on either
side to prevent it from rubbing against the side brackents when mounted.
A table saw sled is kind of indispensable for this type of cut.
I had cut the block that slides to exactly the same width as the rail,
so I trimmed a millimeter off it with the table saw on either
side to prevent it from rubbing against the side brackents when mounted.
A table saw sled is kind of indispensable for this type of cut.
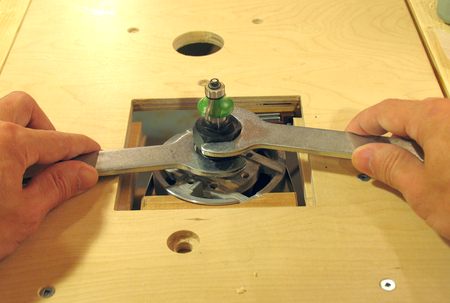 I designed my router lift to have 8 cm of travel (over 3"). The top
of the travel is limited by where the router would hit the table.
It comes up this far so that I can easily get my wrenches around the
collet. If the top of my table and insert weren't 11 mm thick, I'd be
able to put my wrenches around the collet without even removing the insert.
I designed my router lift to have 8 cm of travel (over 3"). The top
of the travel is limited by where the router would hit the table.
It comes up this far so that I can easily get my wrenches around the
collet. If the top of my table and insert weren't 11 mm thick, I'd be
able to put my wrenches around the collet without even removing the insert.
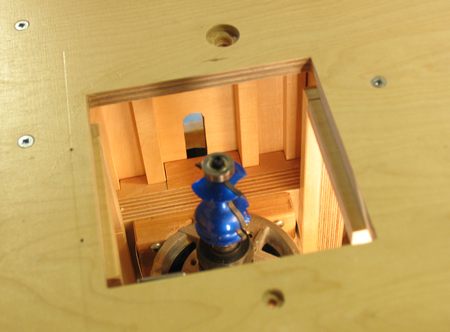 At the other end of the range, the router lowers far enough to sink my
tallest router bit completely below the table surface.
At the other end of the range, the router lowers far enough to sink my
tallest router bit completely below the table surface.
 This photo shows the router lift and table top removed from the table saw.
The table top sits loosely in the frame of my
router table extension for the
table saw. In fact, I just reused the same piece of 11 mm birch plywood
for this table. I had previously put mounting holes into this piece for
two different routers, so the plywood has a few extra holes in it at this
point.
This photo shows the router lift and table top removed from the table saw.
The table top sits loosely in the frame of my
router table extension for the
table saw. In fact, I just reused the same piece of 11 mm birch plywood
for this table. I had previously put mounting holes into this piece for
two different routers, so the plywood has a few extra holes in it at this
point.
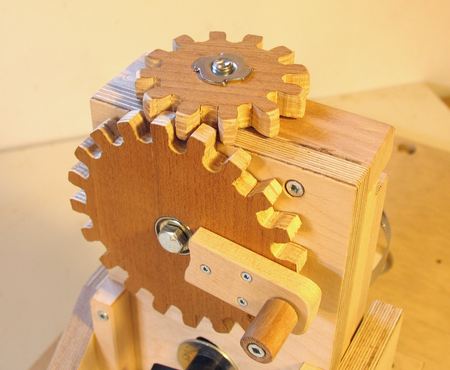 I'm very happy with how the gearing turned out. I used some recycled birch
plywood, which had some dark veneer glued to it. This makes the gears contrast
with the rest of the jig a little. Not that it matters any, but I thought it
was a nice touch.
I'm very happy with how the gearing turned out. I used some recycled birch
plywood, which had some dark veneer glued to it. This makes the gears contrast
with the rest of the jig a little. Not that it matters any, but I thought it
was a nice touch.
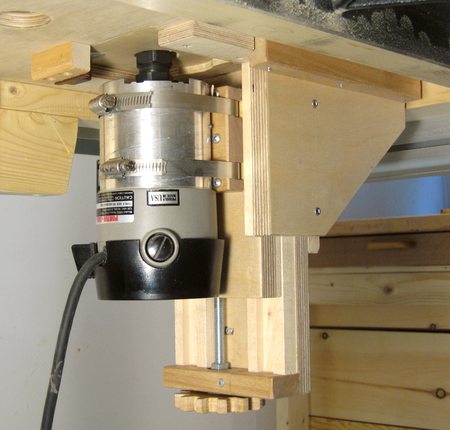
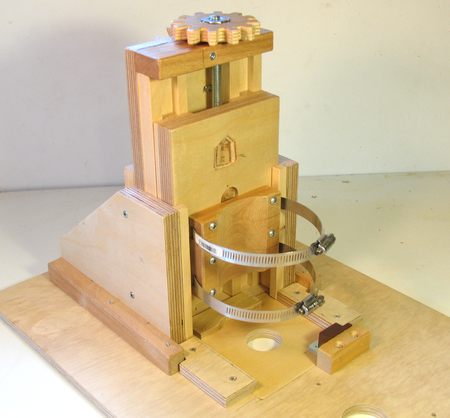 And here's another view of the router lift.
The hose clamps have taken on the approximate shape that they have when
the router is mounted. You can also see a bit of a cutout on the sliding
piece of plywood. I had to cut into it a little bit to make room for
the back of the router, which just barely interfered with this piece of
plywood.
And here's another view of the router lift.
The hose clamps have taken on the approximate shape that they have when
the router is mounted. You can also see a bit of a cutout on the sliding
piece of plywood. I had to cut into it a little bit to make room for
the back of the router, which just barely interfered with this piece of
plywood.
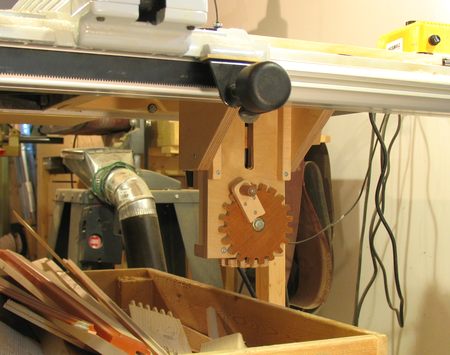 This is where the router lift normally is, tucked neatly under the
table saw extension. Right underneath it is my rolling scrap-wood bin,
which is why I didn't want to make the router lift come any further down
than it does.
This is where the router lift normally is, tucked neatly under the
table saw extension. Right underneath it is my rolling scrap-wood bin,
which is why I didn't want to make the router lift come any further down
than it does.
Next: Router table insert, fence
and a Video of the router lift
Back to my Woodworking website.