Hidden dado bookcase
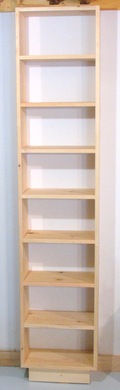
 My friend Melissa wanted another bookcase, similar to this
one. But I don't like building the exact same thing twice, and I wanted to figure out
if there was a better way of building a bookcase like that, without doweling.
I was also hoping to figure out a method that would take less time to build.
My friend Melissa wanted another bookcase, similar to this
one. But I don't like building the exact same thing twice, and I wanted to figure out
if there was a better way of building a bookcase like that, without doweling.
I was also hoping to figure out a method that would take less time to build.
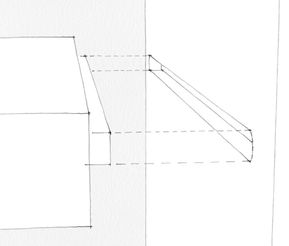
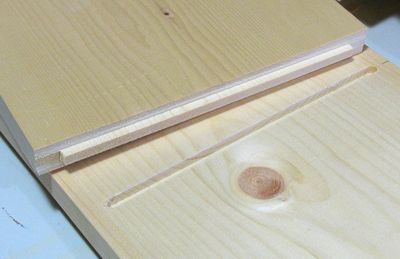
My first idea was to just use dado joints, but she insisted that it should not
be joined with dadoes. So I decided to build it with dadoes anyway, but making them
completely hidden from view - see diagram at left.
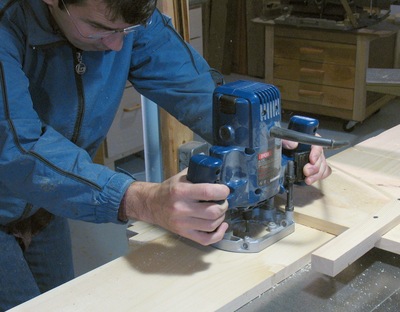
 I decided to make a 1/4" wide dado with my router, about 5 mm deep in the boards.
I used my router instead of my table saw for this, because it was a blind
dado, so the large dado blade wasn't usable. Though a small diameter dado stack
on the table saw might have worked ok, but I only have an 8" dado stack.
I decided to make a 1/4" wide dado with my router, about 5 mm deep in the boards.
I used my router instead of my table saw for this, because it was a blind
dado, so the large dado blade wasn't usable. Though a small diameter dado stack
on the table saw might have worked ok, but I only have an 8" dado stack.
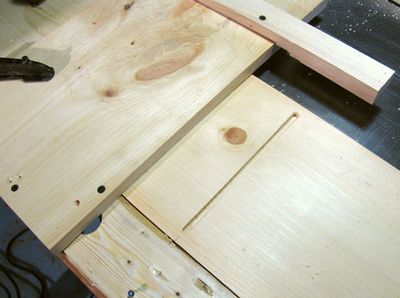
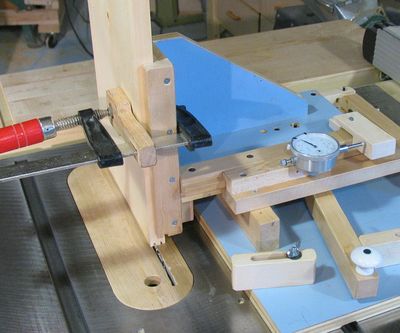
The photo at left shows my temporary jig for cutting the dado. The board at the top
left is what I pushed the router against. The part in the top right limits how
far I can push the router, so that the dado ends at the right point. A small
screw in the piece of wood (barely visible on the bottom of the frame) serves as
a stop on the near side, for starting the dado.
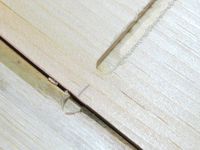
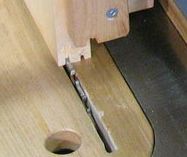
Before I put this screw in, I cut into my jig just a little bit with my
router, to serve as a reference for where the dado would go. See the small photo
at right. It helped me locate the jig in the right spot along the board for each cut.
 The jig is just a few pieces of scrap screwed together with drywall screws, and
I took it apart again after I was done.
This picture shows me routing the slots. Given the direction of cut, and the
clockwise rotation of the cutter, the router naturally pushed itself against
the piece of wood I used for a guide, so having just one edge to run
the router along was enough.
The jig is just a few pieces of scrap screwed together with drywall screws, and
I took it apart again after I was done.
This picture shows me routing the slots. Given the direction of cut, and the
clockwise rotation of the cutter, the router naturally pushed itself against
the piece of wood I used for a guide, so having just one edge to run
the router along was enough.
 With the slots 1/4" wide, and the boards for the shelves 3/4" inch thick, I needed to cut a very
short tenon at the end of the shelf boards.
With the slots 1/4" wide, and the boards for the shelves 3/4" inch thick, I needed to cut a very
short tenon at the end of the shelf boards.
I could have used any number of methods to cut this, but seeing that I had recently
completed my fancy new tenon jig, I decided to
use that jig for that purpose. Though really, just pressing the pieces against
the saw's fence with a fingerboard would have done the job quite nicely.
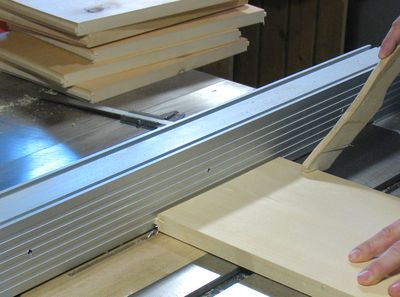 Next it was time to cut the shoulders of the tenons. I just pushed the pieces
flat against the rip fence with the blade up only a few millimeters - shown at left.
I also trimmed the width of the tenons on the saw the same way, but with the
blade raised a bit further, and the boards upright and pushed against the fence.
a
Next it was time to cut the shoulders of the tenons. I just pushed the pieces
flat against the rip fence with the blade up only a few millimeters - shown at left.
I also trimmed the width of the tenons on the saw the same way, but with the
blade raised a bit further, and the boards upright and pushed against the fence.
a
 This photo shows the hidden dado joint. I was able to get a very snug fit.
The joint is probably not as strong as a dowel joint against pull out, but
against load on the shelves, I'm pretty sure it's better than the dowel
joint I had used in the other bookcase
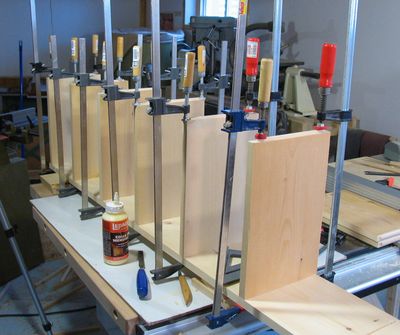 I glued all the shelves into one upright, and let it dry for a few hours.
I ended up running out of clamps when I glued this up, so I had to do it in
two stages.
I glued all the shelves into one upright, and let it dry for a few hours.
I ended up running out of clamps when I glued this up, so I had to do it in
two stages.
 After gluing the one side, I inverted it and stuck all the tenons into the slot
on the other side, one at a time. After inserting the first tenon, I put a clamp
on that end (see clamp on far end), then worked my way to the other end, slotting
one tenon into its respective dado at a time.
After gluing the one side, I inverted it and stuck all the tenons into the slot
on the other side, one at a time. After inserting the first tenon, I put a clamp
on that end (see clamp on far end), then worked my way to the other end, slotting
one tenon into its respective dado at a time.
The photo shows me doing the dry fit, just to make sure it will work out.
After that, I took it apart again, applied glue to both sides, and repeated
the procedure. I then put clamps all along (not shown) to make sure the tenons
were all fully inserted while the glue dried.
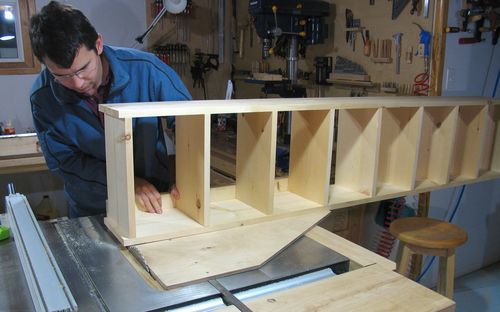 Because there is only about 1/4" of wood on the top side of the top dado, there
was risk of breaking that part out on routing or assembly. So I made the side
pieces about 1/2" longer than I needed, and then trimmed them to length
once the whole shelf was assembled and the glue dried. I just put the whole
shelf on my sturdy table saw sled. It
was quite unbalanced that way, and I had to press down with my hands quite
a bit to hold it down, given that the shelf's center of mass was to the
left of my table saw table.
Because there is only about 1/4" of wood on the top side of the top dado, there
was risk of breaking that part out on routing or assembly. So I made the side
pieces about 1/2" longer than I needed, and then trimmed them to length
once the whole shelf was assembled and the glue dried. I just put the whole
shelf on my sturdy table saw sled. It
was quite unbalanced that way, and I had to press down with my hands quite
a bit to hold it down, given that the shelf's center of mass was to the
left of my table saw table.
A proper sliding table would be nice at times, though I really wouldn't have room
for it in my basement workshop.
See also:
-
Same bookcase, but joined with dowels
Table saw crosscut sled
The Tenon jig I used