Building the bandsaw frame
Having established that my homemade bandsaw wheels
would work, it was time to figure out how the rest of the bandsaw would go together.
My basement workshop unfortunately
has a relatively low ceiling, and an even lower I-beam with just 1.8m clearance
below it running down the middle.
I wanted to be able to put my bandsaw on a dolly and wheel it
under this I-beam. So I had some vertical constraints to deal with.
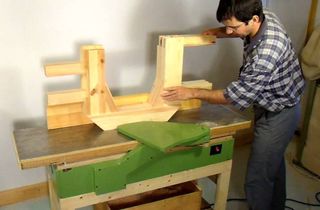
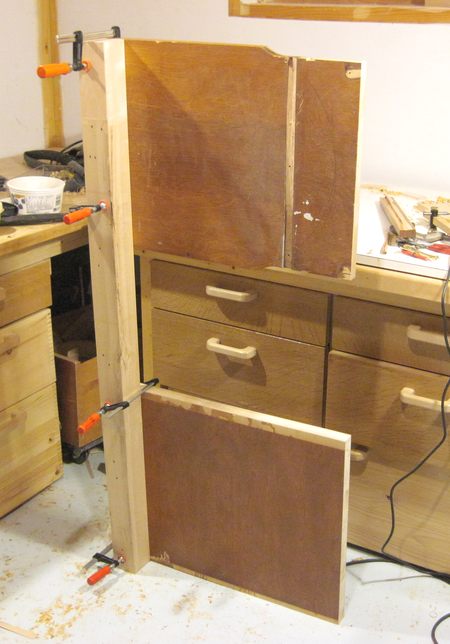 The overall frame for my bandsaw would be something like what is shown at left.
For the post I used a 7.5 x 7.5 cm maple beam that originally came from
an old palette. Two pieces of plywood would attach to this from the back, and then the
wheels to the front of it.
The overall frame for my bandsaw would be something like what is shown at left.
For the post I used a 7.5 x 7.5 cm maple beam that originally came from
an old palette. Two pieces of plywood would attach to this from the back, and then the
wheels to the front of it.
 The plywood pieces came from an old wooden government desk
that I dismantled for the materials. They consisted of laminated
together boards, with two plies of wood glued to either side.
They aren't really plywood, more like a 5-ply plywood but with the middle ply being solid lumber.
This keeps it very flat and prevents warping, so for this job, it was perfect.
And the pieces were already nearly the right size too!
The plywood pieces came from an old wooden government desk
that I dismantled for the materials. They consisted of laminated
together boards, with two plies of wood glued to either side.
They aren't really plywood, more like a 5-ply plywood but with the middle ply being solid lumber.
This keeps it very flat and prevents warping, so for this job, it was perfect.
And the pieces were already nearly the right size too!
When I later built my second homemade bandsaw, I came up
with building a sturdy frame without having to rely on odd found materials.
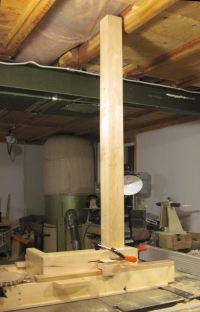
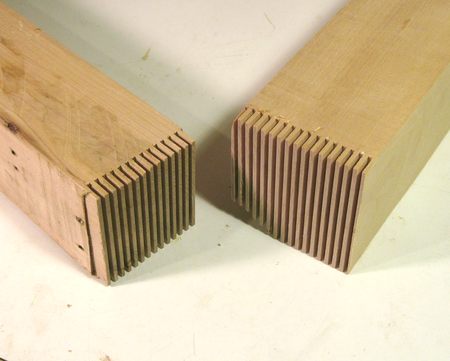 Despite my height constraints, the 7.5 x 7.5 cm maple post I had was about 20 cm shorter
than what I needed. So I used my screw advance
box joint jig to finger joint another solid
piece of maple onto the end of it. I had to nudge the table saw over a little bit
to let the longer section of the post protrude between two ceiling joists in my shop
to make the cuts. The finger joint will of course be a weak spot in the
post, but it's near the end of the post.
Despite my height constraints, the 7.5 x 7.5 cm maple post I had was about 20 cm shorter
than what I needed. So I used my screw advance
box joint jig to finger joint another solid
piece of maple onto the end of it. I had to nudge the table saw over a little bit
to let the longer section of the post protrude between two ceiling joists in my shop
to make the cuts. The finger joint will of course be a weak spot in the
post, but it's near the end of the post.
Strength was actually not that critical. I worked out that my maximum blade tension
would be about 150 kg, or 300 pounds. That's actually not even twice my
body weight, and over a span of 18" (45 cm), it would only be a fraction
of the load that a beam this size could handle.
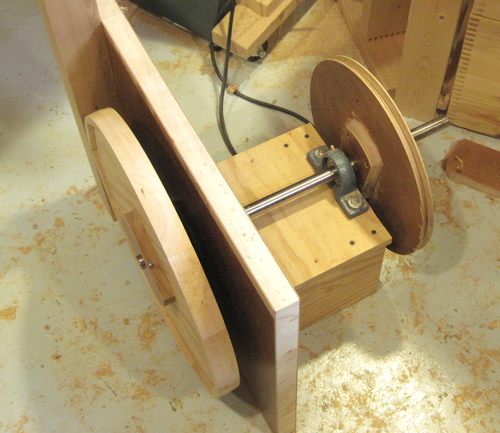 I mounted the flange bearing on the front of the lower board, and made a sort of
shelf for the pillow block bearing sticking out from the back. I needed some
distance between the bearings so that the leverage from the blade tension
on the lower wheel wouldn't cause undue amount of force on the bearings.
I mounted the flange bearing on the front of the lower board, and made a sort of
shelf for the pillow block bearing sticking out from the back. I needed some
distance between the bearings so that the leverage from the blade tension
on the lower wheel wouldn't cause undue amount of force on the bearings.
I mounted the drive pulley on the far end of my drive shaft. Both wheels
are attached with a screw in the hub that protrudes into holes that I drilled into
the drive shaft. Keyways on the shaft would of course have been much better, but
I am no machinist and couldn't think of a good way of cutting a keyway
at the time.
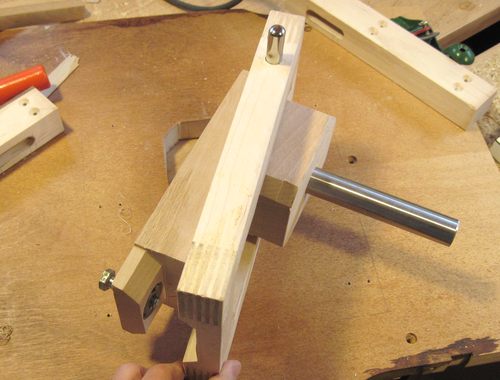 The top wheel of the bandsaw rotates on a stationary shaft. This stationary shaft needs
to be able to move up and down to tension the blade as well as tilt forwards
and back to adjust blade tracking.
The top wheel of the bandsaw rotates on a stationary shaft. This stationary shaft needs
to be able to move up and down to tension the blade as well as tilt forwards
and back to adjust blade tracking.
I had read at some point that for North-American style cast-iron-frame style bandsaws, the
thing that fails first from excessive blade tension is the upper blade tilt mechanism. With
my tilt mechanism only made out of wood, I decided to make it massive to make sure that
this part of my bandsaw would never fail.
The shaft is pressed into a block of hardwood, about 8 x 8 cm. The block of hardwood
tilts on a 13 mm steel shaft inside the rectangular frame. The rectangular frame is
finger joined at the corners, again done with my screw advance box joint jig.
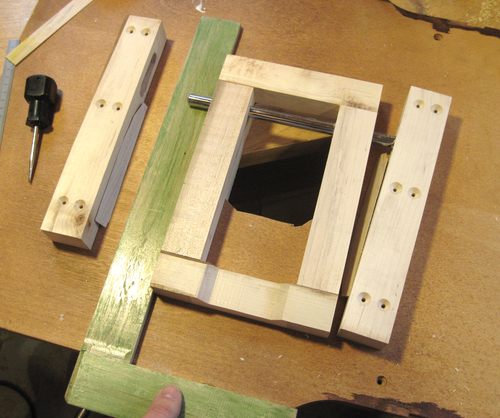 The ends of my 13 mm shaft slides up and down in slots in two blocks of wood
screwed to the plywood on either side.
The ends of my 13 mm shaft slides up and down in slots in two blocks of wood
screwed to the plywood on either side.
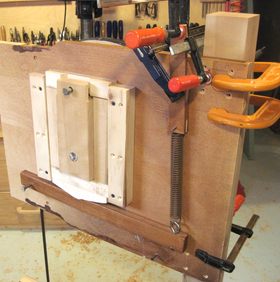
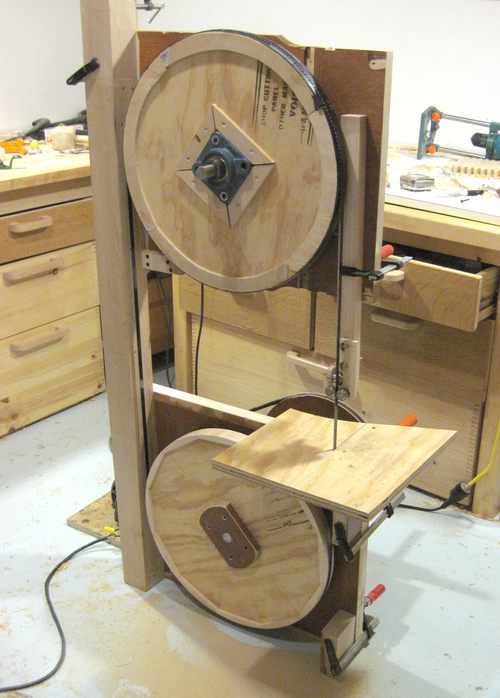
 With my upper and lower wheel mounts completed, it was time to do some testing.
I hadn't yet decided on what vertical position to use for the upper wheel
assembly, so I just clamped onto the post with some C-clamps.
With my upper and lower wheel mounts completed, it was time to do some testing.
I hadn't yet decided on what vertical position to use for the upper wheel
assembly, so I just clamped onto the post with some C-clamps.
I was also a bit at a loss as to what to do for a blade tensioning mechanism. I didn't have
a suitably stiff spring to give me the kind of force that I needed, and I didn't know
where to get one either. So I used a big tension spring, and a lever to multiply the
force to get a bit more blade tension. Ironically, this spring came from the same
government desk that my plywood panels came from. It was part of a mechanism to raise and lower
a heavy typewriter out of a side-compartment on the desk.
Spinning the wheels manually, my blade tracked on the center of the wheels even without
making any adjustment to the tracking. I couldn't wait to actually try making some cuts
with this saw! You can see that my shop has gotten a bit messy at this point.
Cleaning just wasn't as exciting as working on the bandsaw.
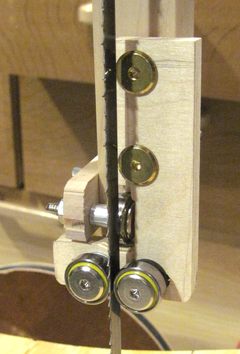
 I came up with a blade guide design using three rollerblade ball bearings. One
bearing on either side, and one behind the blade.
I attached this to the end of a piece of
wood, and just clamped that to the saw. I also clamped a few more bits of wood
to the bottom part of the frame to make a temporary table. With this
arrangement, I was ready to make my first test cuts.
I came up with a blade guide design using three rollerblade ball bearings. One
bearing on either side, and one behind the blade.
I attached this to the end of a piece of
wood, and just clamped that to the saw. I also clamped a few more bits of wood
to the bottom part of the frame to make a temporary table. With this
arrangement, I was ready to make my first test cuts.
I was still using the same 1/3 hp motor that I started my experiments with, but
once I started cutting some heavier stock, that motor ran out of 'oomph' and
I had to cut a little more slowly to keep the saw from stalling.
The other problem was that without a stand, the saw table was just 50 cm off the
floor, which meant I had to get on my knees to use the saw. With no guards
whatsoever, and me not having much trust in this contraption just yet, it didn't
feel very safe. There was an awful lot of shaking, and little to hold the
saw or keep it from tipping over. I did clamp a small block of
wood to the bottom right to make it less likely to tip forward. I also realized
the top wheel was substantially out of balance, and drilled some holes in it
to balance it before any further testing.
Once I switched
to my big 1.5 hp 3500-RPM motor, I had a blade speed of about 14 meters per second,
or about 2800 feet per minute. Faster than I wanted it to be, but I was already
using the smallest pulley on my motor and a large pulley on the drive shaft.
I found that my blade guide was very loud. The ball bearings came from rollerblade
wheels, and I guess they just weren't rated to spin 12,000 RPM.
I decided to redo my blade guide with just blocks on either side. The back bearing
I'd leave as a bearing though, but that bearing only makes contact with the
blade while actually making a cut.
Next:
Tensioner and blade guides
Back to Building a bandsaw
 Making the frame
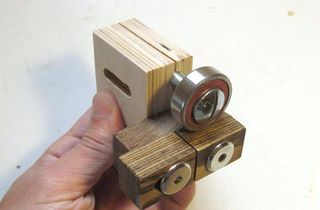 Bandsaw blade guides
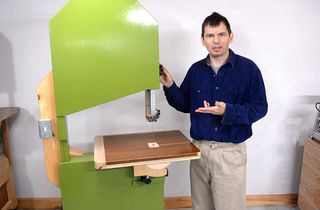 20" bandsaw build