|
|
Most American style hybrid and contractor saws are constructed in a similar way, so if you need to align your table saw, this article may provide some useful tips.
I should say that completely disassembling the saw as I did isn't usually necessary, but it does make working on the alignment a lot easier. It also gave me the opportunity to modify the depth of cut limit stops on the saw to get more depth of cut. I started by removing the table extensions I had built for the saw, as well as the cast iron table extensions and the fence. I also removed the motor, to make the saw lighter and easier to handle.
The motor can be quite a bother to remove, but with the saw set for a 45 degree angle, The motor protrudes a fair bit into the extension of the base, so with the base's extension flipped open, lifting the motor off its mounts is manageable, especially because you can get your knees under it.
The next step was to tip the saw onto its side, and flip it all the way over. I flipped it onto some pieces of carpeting to protect the cast iron table.
With the crank handles removed, the shaft for the depth adjustment screw comes out relatively easily. For the other shaft, I removed the bearing from the case, and just slid the saw's base off the shaft.
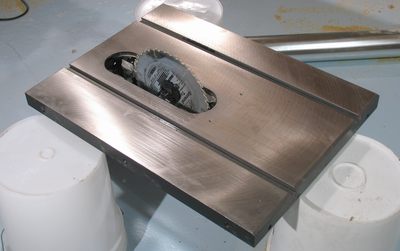
 With the base removed, I was left with just the basic table, and trunnions attached.
This is the core of the saw, and what makes it precise, or imprecise. Really, not that much to it once
all the other stuff is removed.
With the base removed, I was left with just the basic table, and trunnions attached.
This is the core of the saw, and what makes it precise, or imprecise. Really, not that much to it once
all the other stuff is removed.
Uupdate:
I didn't think to check this at the time, but you should also make sure that the two rods between
the front and back trunnions were parallel. These can get out of parallel if, for example,
if the motor hits something while you adjust the angle of cut and you try to force the
adjustment anyway. If they are out of parallel, loosen the nuts on one end, clamp something
flat to both rods, re-tighten the nuts and visually check that the rods are parallel.
My saw was less than 6 months old at the time, so I doubt these would have been out on my saw.
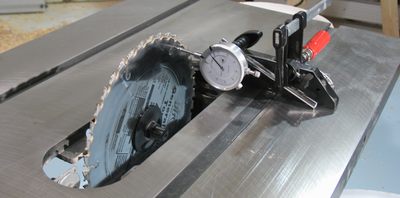
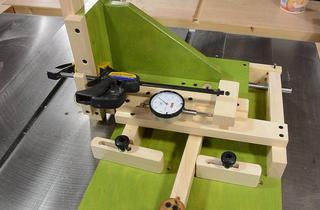
 The top on its own can be man handled, although perhaps just barely so. I propped the top up on three
buckets, and put the blade back in. This gave me good access to the top and bottom, so I could
measure and adjust it without moving it around or crazy contortions.
The top on its own can be man handled, although perhaps just barely so. I propped the top up on three
buckets, and put the blade back in. This gave me good access to the top and bottom, so I could
measure and adjust it without moving it around or crazy contortions.
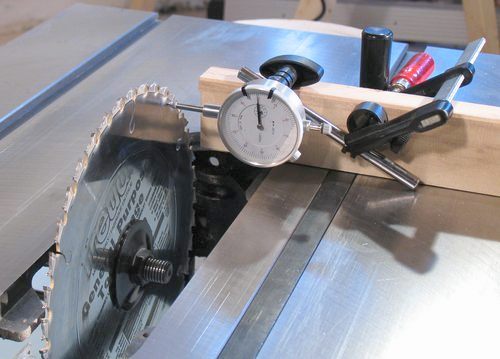
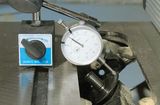
Its also important, when setting the blade to 90 degree,s to crank it against the stop with the same amount of force that you would normally do. The force of the 90 degree stop can affect the alignment, so its best to be consistent with how hard you push it against the stop, so that your adjustments will compensate for this factor.
On my saw, pushing it hard against the stop, vs barely in contact, makes about a .005" difference in runout along the length of the blade. I'm assuming that if I crank it against the stop the way I usually do, I'll probably get an error of +/- .001" this way, which for my purposes, I deem acceptable.
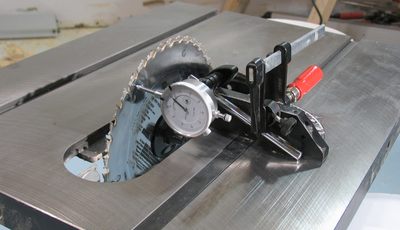 The next step is to slide the dial indicator forward. Also turn the blade so that the dial indicator
touches the same spot on the blade as in the previous step. That way, any wobble that the blade
might have is canceled out - i.e., if the blade was bent to the left where the first measurement was taken,
it would be bent to the left by the same amount in the second measurement, because the same spot on the
blade is measured. Push the miter gauge towards the blade while measuring to again cancel out any
play that it might have in the T-slot. Note the difference in distance, if any. It should be on the
order of .003" or less.
The next step is to slide the dial indicator forward. Also turn the blade so that the dial indicator
touches the same spot on the blade as in the previous step. That way, any wobble that the blade
might have is canceled out - i.e., if the blade was bent to the left where the first measurement was taken,
it would be bent to the left by the same amount in the second measurement, because the same spot on the
blade is measured. Push the miter gauge towards the blade while measuring to again cancel out any
play that it might have in the T-slot. Note the difference in distance, if any. It should be on the
order of .003" or less.
 If the difference is larger than this, loosen the screws for one of the trunnions (either will do), and
move them to the side. By loosen, I mean just back the screws holding the trunnions to the table a little
bit, they should still be tighter than finger tight.
If the difference is larger than this, loosen the screws for one of the trunnions (either will do), and
move them to the side. By loosen, I mean just back the screws holding the trunnions to the table a little
bit, they should still be tighter than finger tight.
Moving the trunnion to the side a bit is best accomplished with a piece of wood and a hammer. From the camera's perspective, I needed to move the infeed side to the left. The end of the piece of wood I'm holding rests against the trunnion, and I tap the other end with a hammer.
This is an iterative process, so go back and forth between tapping it and checking the alignment until you have it right.
I should add that on the delta saw, the 90 degree limit stop is accomplished by the trunnion hitting a set screw in the table. To avoid that screw making moving the trunnions more difficult, it's a good idea to back that screw out a little bit. Seen from the operator side of the saw, it's the setscrew in the table to the front right of the saw insert. That way, that screw doesn't add friction in terms of moving the alignment. or do the alignment with the blade just slightly off 90 degrees, so that the trunnions are not pushing against the limit screw.
If you aren't taking your saw fully apart, and only need to make a minor adjustment, its probably best if you adjust the runout by moving the rear trunnion instead, ad that trunnion can be accessed much better from the rear, especially on contractor saws, which are open on the back.
If the distance differs a bit, adjustment is accomplished by adding or removing washers from under one of the trunnion mounts.
On my saw, there was a .008" difference front to back. To avoid excessive iterations, figuring out how much to add or remove is best done by making some calculations.
The .008" difference measured on the diagonal needs to be multiplied by 1.41 to get the amount of displacement needed in the vertical (1.41 is one over the sine of 45 degrees). So on my saw, the front edge of the blade needed to be raised by .0113 with respect to the back edge. However, the points I measured on the blade were only separated by 8", while the trunnions are separated by 16", so I still needed to double that to find out the displacement at the trunnions. So what it came down to, I needed to raise the infeed trunnion by .0226", or lower the outfeed one by that much.
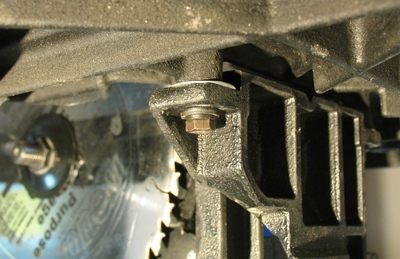 As it turned out, the factory had already put some washers under the infeed trunnion, but more
than they should have. The washers were .013" thick, so I removed two from each side. This didn't get
me spot on, but close enough.
As it turned out, the factory had already put some washers under the infeed trunnion, but more
than they should have. The washers were .013" thick, so I removed two from each side. This didn't get
me spot on, but close enough.
If you find that you need extra washers for your saw, aluminium pop cans make excellent material for such tasks, and they can be cut with scissors, once you have the can apart (but be careful, it's surprisingly easy to cut yourself on a cut up pop can). If you are content with plastic washers, 2 liter pop bottles also make an excellent material to make that sort of spacer out of.
Once you have changed the washers, check the blade alignment at 90 degrees and adjust as necessary before rechecking the 45 degree alignment.
By leaving the other of the two mounting screws on the trunnion moderately tight while replacing the washers on one side, you can minimize, but not eliminate any lateral misadjustment that you will reintroduce when changing the washers..
 readjusting the 90 and 45 degree stops
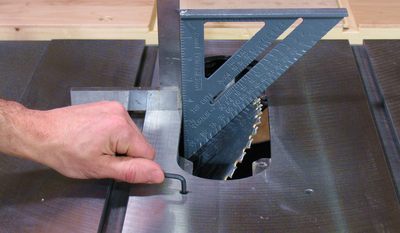
On the delta saw, the 90 and 45 degree stops are set with screws through the cast iron table. These need to be readjusted after alignment is done. Fortunately, this is quite easy. Just back the screws out a turn or two with an alan key, use a square and a 45 degree square to ensure the blade is at 90 and 45 degrees respectively, and then turn the alan screw back in until it hits. Next move the blade away from the stop and against the stop again to ensure where it hits is indeed 90 or 45 degrees.
It's really quite time consuming to get the alignment right. I would imagine part of what makes the higher quality saws more expensive is that they spend more time getting the alignment right in the first place, and if they need adjusting, its probably easier. But if you can buy a cheap saw and then fix the alignment yourself, that's a pretty good deal too.
Hopefully, you won't need to take your saw completely apart to align it. Though I had mine apart because I also made a maximum depth of cut modification to mine.
 Home made quick-set tenon jig
Back to my Woodworking website
 Fixing the wobble in a table saw arbour
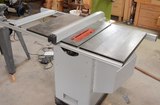 What's a hybrid table saw?
 Making a zero clearance able saw insert
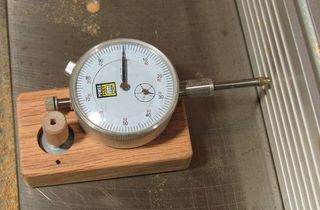 Table saw fence micro adjusting
 Effects of table saw misalignment
 Hybrid table saw bearing replacement