Table saw dust extraction
|
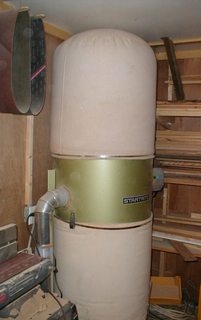
So when I found this large dust extraction blower system at a University of Waterloo surplus sale, I bought it. The next challenge was where to put it and how to hook it up.
I ended up putting it into the corner of my workshop. I didn't know where to get the proper hoses for this sort of thing, so I used 4" sheet metal duct pipes, which I ran from the inlet of the dust extractor to near my table saw.
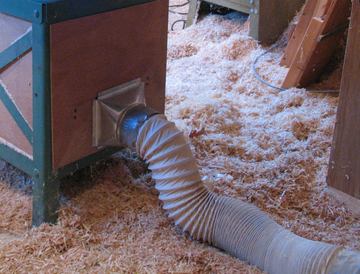 Dryer hose hooked up to the saw (The shavings on the floor are intentional) |
More as an experiment than anything else, I decided to try connecting the saw to the fixed end of the sheet metal duct pipe with a cheap piece of dryer hose, just to see how long it would last. If it would last a year, I figured I could just keep replacing it. Certainly, its very flexible, which is handy when moving the saw around a little bit.
Well, more than 10 years later, I'm still using that original piece of cheap dryer hose, so I guess it held up much better than I'd imagined.
I don't run the dust extraction system every time I use my table saw. Even with just the enclosure on the bottom of the saw, it cuts down on flying dust tremendously.
With the dust extraction system being relatively powerful, sometimes I just run it while doing work on the lathe or with a router. It has enough volume that it will circulate roughly all the air from the workshop through the dust extractor every 15 minutes, so running it, even near the source of dust, tends to clear the air of fine dust over time. Very handy that way!
You may wonder about all the planer shavings on the floor. I spread these around intentionally. Initially as makeshift floor insulation in the winter, but then I realized the padding they provide really helped in terms of foot comfort while working in the shop. When the shavings got too full of other types of dirt, I sweep them up and throw them out, and then spread fresh shavings on the floor right away.
Keeping shavings on the floor is only practical in a detached shop, where tracking the dust through the house is not an issue. In my basement workshop, I always sweep up the shavings.
Also see my homemade dust collector
Back to my Table saw page