Wood grain macro photography setup
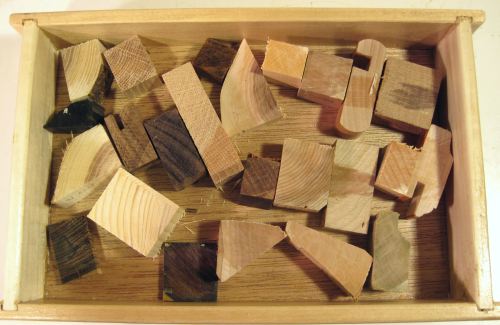 I wanted to take macro photos of the wood grain of various species of wood.
So I went to a local hardwood dealer,
KJP select hardwoods and bought various
hardwood samples out of their "off cuts" bin. The samples I got were much too small to make any sort
of furniture out of, but they didn't cost very much and were more than big
enough to cut some samples off for my purposes. I combined the exotic specimens
from KJP with a selection of domestic pieces I had around the workshop and in total
came up with over 20 species to photograph.
I wanted to take macro photos of the wood grain of various species of wood.
So I went to a local hardwood dealer,
KJP select hardwoods and bought various
hardwood samples out of their "off cuts" bin. The samples I got were much too small to make any sort
of furniture out of, but they didn't cost very much and were more than big
enough to cut some samples off for my purposes. I combined the exotic specimens
from KJP with a selection of domestic pieces I had around the workshop and in total
came up with over 20 species to photograph.
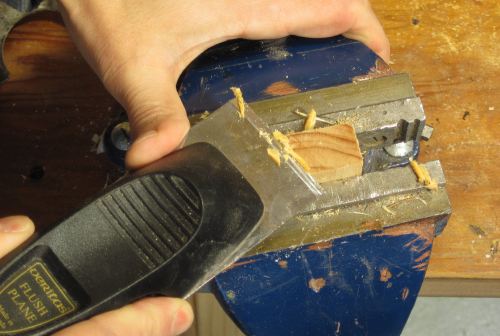 To get a clear shot of the end grain,
I had to cut it to a shiny smooth surface. I used
a "Veritas flush plane" for that. It was the perfect tool for the job.
I have to admit though that I have owned that flush plane for 10 years now
and this is the first time that I found a really good use for it.
To get a clear shot of the end grain,
I had to cut it to a shiny smooth surface. I used
a "Veritas flush plane" for that. It was the perfect tool for the job.
I have to admit though that I have owned that flush plane for 10 years now
and this is the first time that I found a really good use for it.
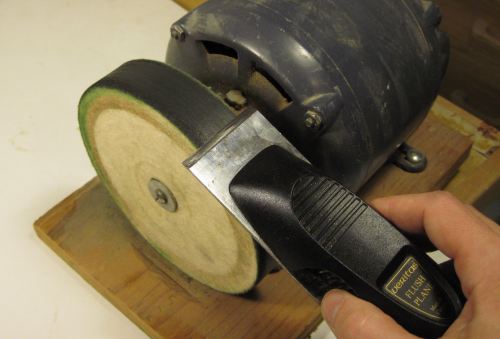 I had to get a very sharp edge on the flush plane.
I don't have a lot of sharpening accessories, so I sharpened the plane with
the same grinder that I used for
sharpening my jointer knives.
The grinder makes for a reasonably good edge - good enough to use in a jointer
at any rate.
I had to get a very sharp edge on the flush plane.
I don't have a lot of sharpening accessories, so I sharpened the plane with
the same grinder that I used for
sharpening my jointer knives.
The grinder makes for a reasonably good edge - good enough to use in a jointer
at any rate.
More about sharpening handplanes
But I needed a very smooth edge. So I used my felt buffing wheel to put a shine
on the edge of the blade. I figure if it's shiny, it's smooth. The buffing wheel
does produce a mirror shine. I find that in general, to get a cut that
is smooth enough to be shiny, I need a knife edge that is shiny as well.
 To get my moderate magnification macro photos, I used the same 35 mm camera lens
that I used for my previous macro photo experiments
To get my moderate magnification macro photos, I used the same 35 mm camera lens
that I used for my previous macro photo experiments
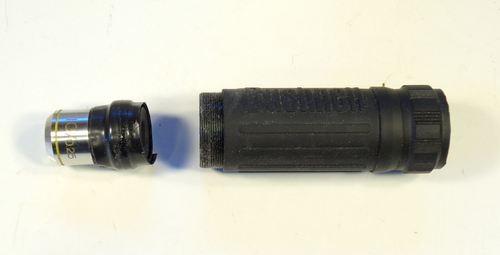 I used a microscope objective lens for the highest magnification photos. I
found this microscope objective lens kicking around my drawers when I was rummaging
through various bits of optics I have while trying to find something better
than the 13 mm focal length 8-m movie camera lens that I used previously.
I used a microscope objective lens for the highest magnification photos. I
found this microscope objective lens kicking around my drawers when I was rummaging
through various bits of optics I have while trying to find something better
than the 13 mm focal length 8-m movie camera lens that I used previously.
I had experimented with holding the microscope lens directly in front of the camera's lens, but the magnification I got that was not that high. Sharpness towards the edges was also quite poor. The microscope lens just wasn't designed to be photographed into like that. It was designed to project an image into an eyepiece.
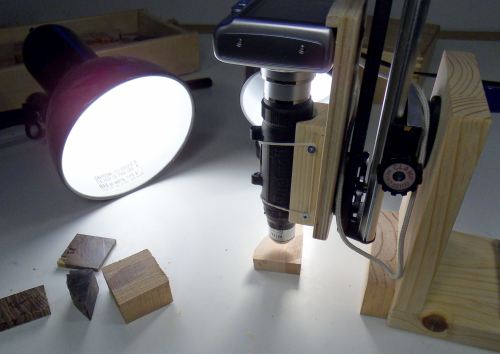
Microscope eyepieces are designed to have an image projected into them by the microscope objective lens. The projected image is then turned into a far-field virtual image by the eyepiece, so that the eye can see it clearly.
As it turns out, binocular eyepieces are designed to do just that as well. So I took a perfectly good pair of compact Bushnell 8x24 binoculars and used the barrel and eyepiece with my microscope objective lens. I didn't completely waste the binoculars though. It turns out that half of the binoculars functions as a pretty decent monocular on its own.
The binocular barrel also had an inverter prism in it, which also helped. Otherwise, with the optical path that I had, my image would have been upside-down. Upside-down would not have mattered much for the photos, but its very hard to orient and move around an image when the image is inverted. Normal optical microscopes also have inverting prisms in their optical path.
The setup with the binocular barrel and eyepiece produced about 5x as much magnification as I got with the 35 mm camera lens, but it was much harder to get sharp images. My depth of field was becoming very limited. Depth of field can be increased by using a smaller aperture, but that reduces the amount of light, and can also cause blur due to diffraction. I was starting to approach the limits for magnifying opaque objects with reflected light.
Pushing the shutter button was also a bit of a challenge. The depth of field was so
shallow that just touching the setup would throw it out of focus. I ended up using
the 10 second timer, and then, looking at the view finder, flex the apparatus
a little bit just by pushing on it to find the best focus during the delay. Then
I'd just hold that position until it triggered. Not every photo was in focus, but
it was easy enough to review the images to check and redo it. A real microscope would
have been better, but I was satisfied with what I was able to kluge together on the cheap.
Back to Macro photographing woods
![]()