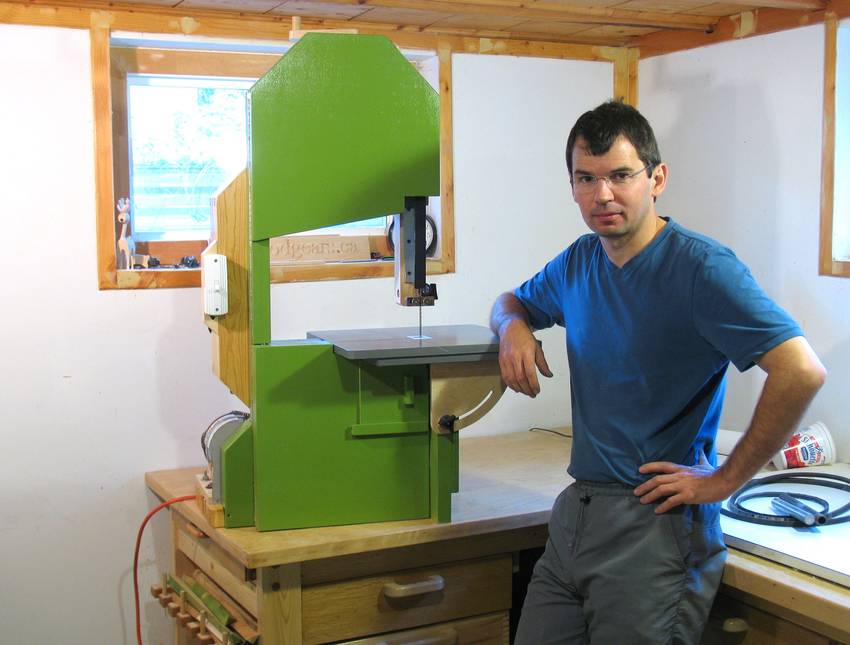
This 14" bandsaw is my third homemade bandsaw. For the most part, the design is based on my 16" bandsaw, but with a number of changes to experiment with simplifying the design.
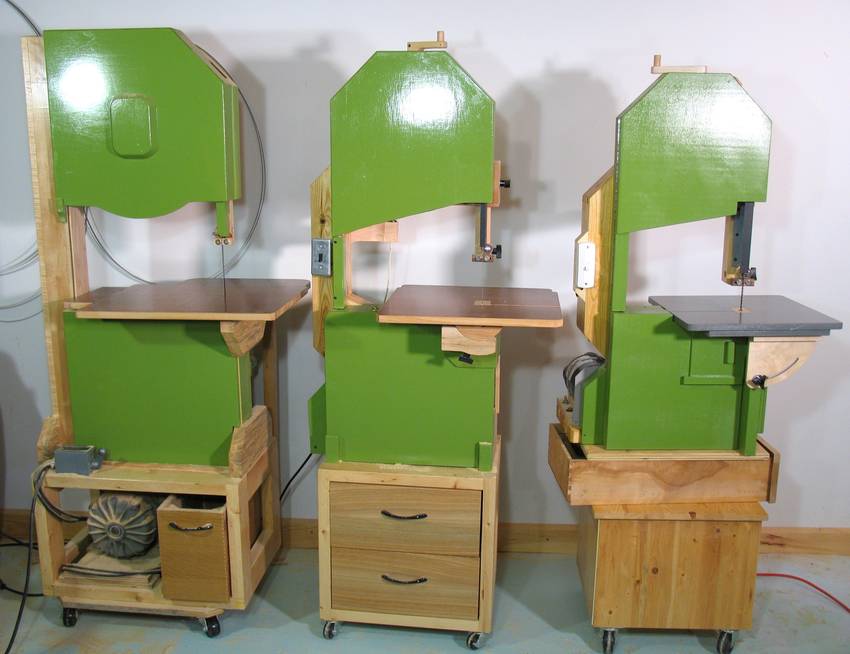 In the picture, from left to right, you can see my first 18" bandsaw, my 16"
bandsaw, and my new 14" bandsaw.
In the picture, from left to right, you can see my first 18" bandsaw, my 16"
bandsaw, and my new 14" bandsaw.
Not shown are my 20" bandsaw and 26" bandsaw that I built later.
When building your own bandsaw, it makes more sense to build a larger one because larger bandsaws are much more expensive to buy, but building a bigger bandsaw only adds marginal material and effort over a smaller one. I wanted this bandsaw to be relatively light and portable, so this one has only a 14" (35 cm) wheel size.
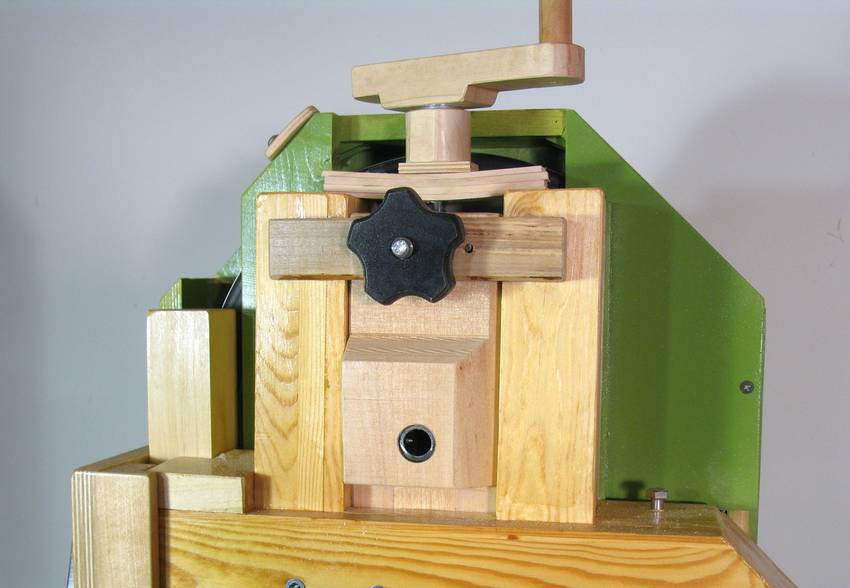
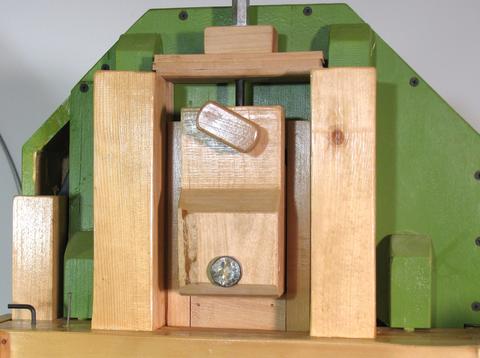 Previous design on my 16" saw |
This eliminated the need for a frame around the top wheel mount, simplifying construction. It also makes room for more robust parts and allows the shaft to be lowered closer to the beam of the frame.
A disadvantage is that it relies on the force of blade tension to firmly fix the top wheel mount in place, so it's a bit loose without a blade.
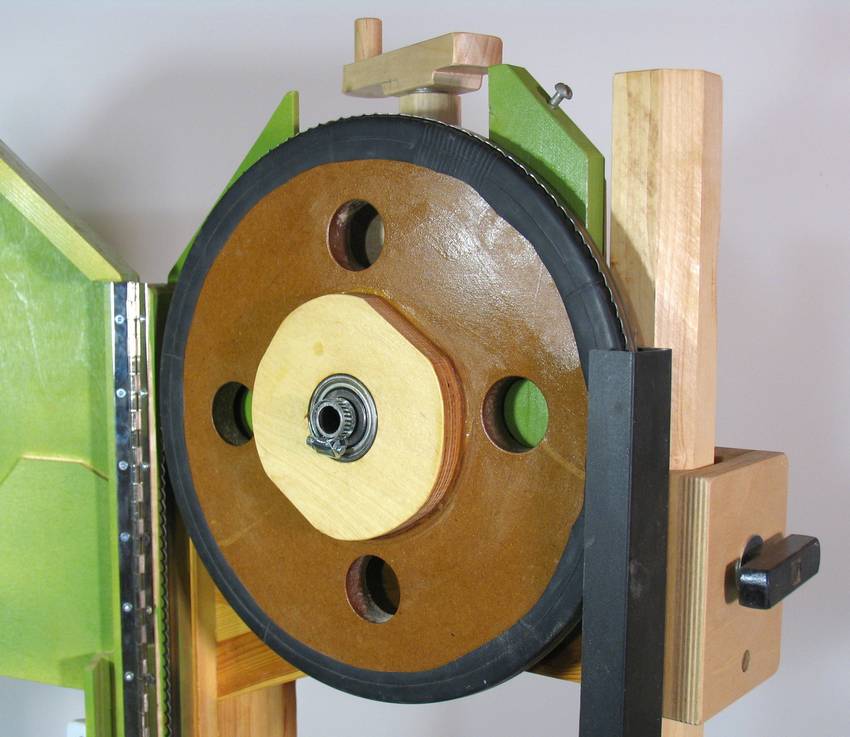 People have often asked me if the bandsaw wheels can be made out of MDF.
Personally I really don't like MDF, but I had some MDF lying around, and for the sake of determining the suitability of it, I figured I'd use it to make the wheels.
The way the chips came out when I drilled the holes reminded me of the fact that MDF is really just compressed cardboard. The dust from turning the wheels is also kind of awful. The turned outside edge came out very consistent, though not smooth. An advantage of MDF is that, unlike some cheap plywood, it has no voids. Another pleasant surprise was that the MDF wheels needed very little balancing.
I used Baltic birch plywood for the wheel flanges. The flanges need to have the bearings press fit very tightly into them, and I didn't think MDF would be up to the job.
I don't de-tension the saw when I'm not using it, and I have not had any problems with it so far. So my conclusion is that MDF is suitable for bandsaw wheels. Though personally I still prefer plywood.
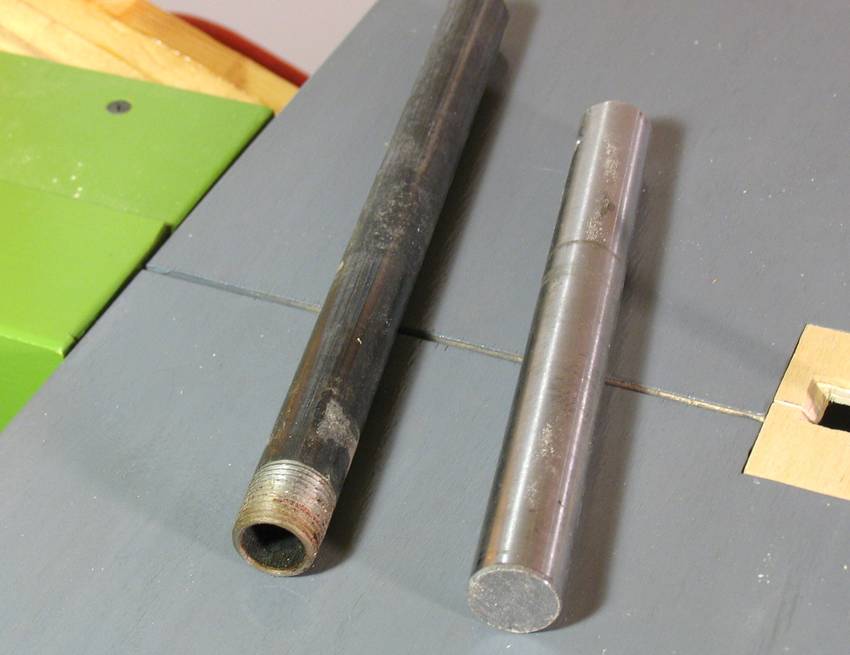 My next experiment was to use plumbing pipe for the shaft material.
Sometimes people don't know where to get the shafting material for their
homemade bandsaws, so I thought I'd explore using plumbing pipe as an alternative.
Regular plumbing pipe has an outer diameter just smaller than 7/8", so with
a bit of shimming, a snug fit in a 7/8" (22.2 mm) bearing can be achieved.
With the wheels turning on stationary
shafts, a super exact fit wasn't that critical.
My next experiment was to use plumbing pipe for the shaft material.
Sometimes people don't know where to get the shafting material for their
homemade bandsaws, so I thought I'd explore using plumbing pipe as an alternative.
Regular plumbing pipe has an outer diameter just smaller than 7/8", so with
a bit of shimming, a snug fit in a 7/8" (22.2 mm) bearing can be achieved.
With the wheels turning on stationary
shafts, a super exact fit wasn't that critical.
Overall, the plumbing pipe worked out OK, though it adds more work because you always have to insert shims. Searching my house for suitable shim material, I found some plastic food containers whose plastic was just the right thickness for a snug fit.
Overall though, I think it's worth getting proper shafting material - it makes the build much easier. But if you can't get shafting material and are an experienced tinkerer, plumbing pipe is a workable substitute.
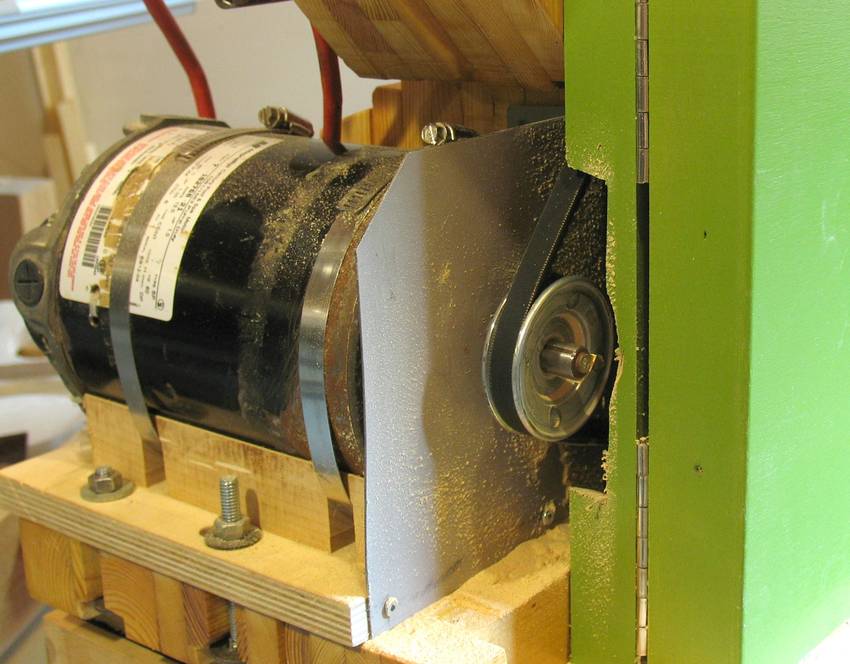
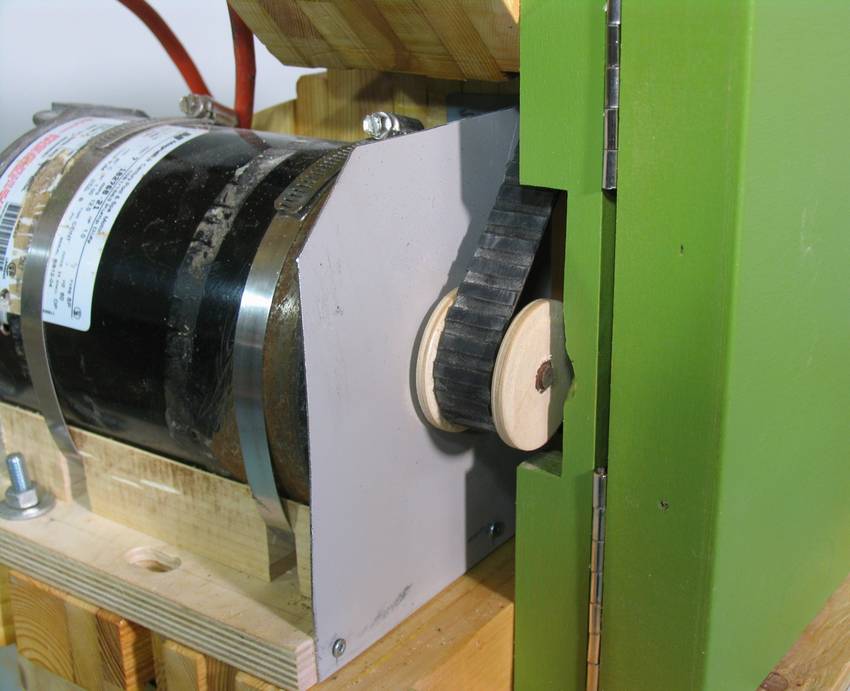 I figured I'd experiment with using a flat belt for the drive belt on this
bandsaw. Because I was using a 3500 RPM motor, I needed quite a bit of reduction,
which meant a small pulley on the motor, which in turn means that a V-belt would
be relatively inefficient.
I figured I'd experiment with using a flat belt for the drive belt on this
bandsaw. Because I was using a 3500 RPM motor, I needed quite a bit of reduction,
which meant a small pulley on the motor, which in turn means that a V-belt would
be relatively inefficient.
I have to say, using a flat belt was the least successful design aspect of this saw, and my advice is: Don't use a flat belt!
It was very difficult to get that belt to track properly. Also, with just a 4 cm diameter pulley, it takes a lot of tension to transfer the motor's torque to the wheel. Worse yet, if the saw stalls in a way that the belt slips, it will slip on the motor pulley. The wooden pulley doesn't conduct heat very well, so a stalled belt will heat up to the point of smoking within one second of stalling (speaking from experience!)
 The belt I am using is an old Honda Civic timing belt, turned inside out and with
the teeth shaved off with a chisel. I had a lot of difficulty getting that belt
to track on the crowned pulleys.
The belt I am using is an old Honda Civic timing belt, turned inside out and with
the teeth shaved off with a chisel. I had a lot of difficulty getting that belt
to track on the crowned pulleys.
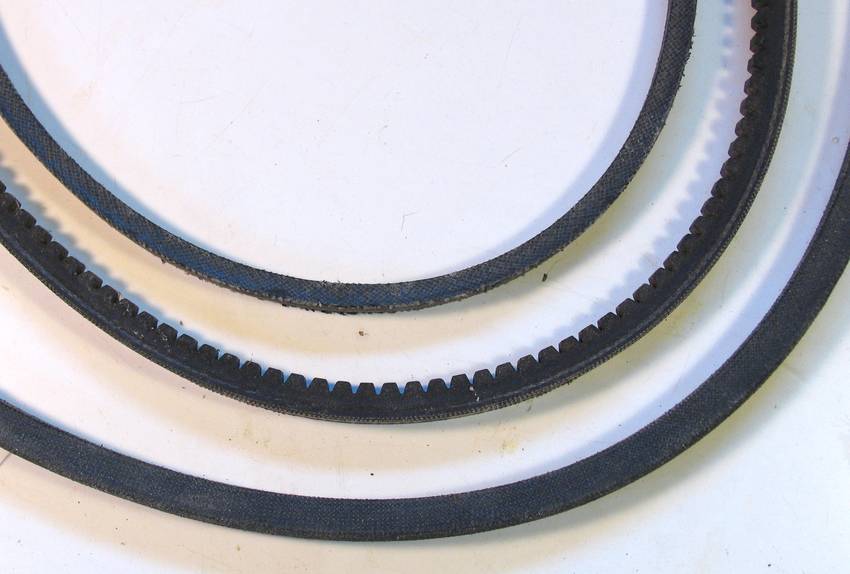 Looking at different types of V-belts, there are some belts that will bend with
less resistance than others. At left, topmost is a smaller V-belt from my drill press.
Such a belt would bend more easily.
The middle belt is one that only has the reinforcing fiber on the outside edge
and teeth on the inside. This belt bends much more easily and would probably
work on a small pulley without as much loss in power as a regular V-belt
(bottom belt in the picture).
Looking at different types of V-belts, there are some belts that will bend with
less resistance than others. At left, topmost is a smaller V-belt from my drill press.
Such a belt would bend more easily.
The middle belt is one that only has the reinforcing fiber on the outside edge
and teeth on the inside. This belt bends much more easily and would probably
work on a small pulley without as much loss in power as a regular V-belt
(bottom belt in the picture).
 All this only an issue if you use a 3500 RPM motor (or a 2900 RPM motor
if you have a 50 Hz electrical grid). For a 1750 or 1450 RPM motor, you would use
a 3" or 4" (7.5 - 10 cm) pulley on the motor, so the belt wouldn't have to
bend around as small a radius.
All this only an issue if you use a 3500 RPM motor (or a 2900 RPM motor
if you have a 50 Hz electrical grid). For a 1750 or 1450 RPM motor, you would use
a 3" or 4" (7.5 - 10 cm) pulley on the motor, so the belt wouldn't have to
bend around as small a radius.
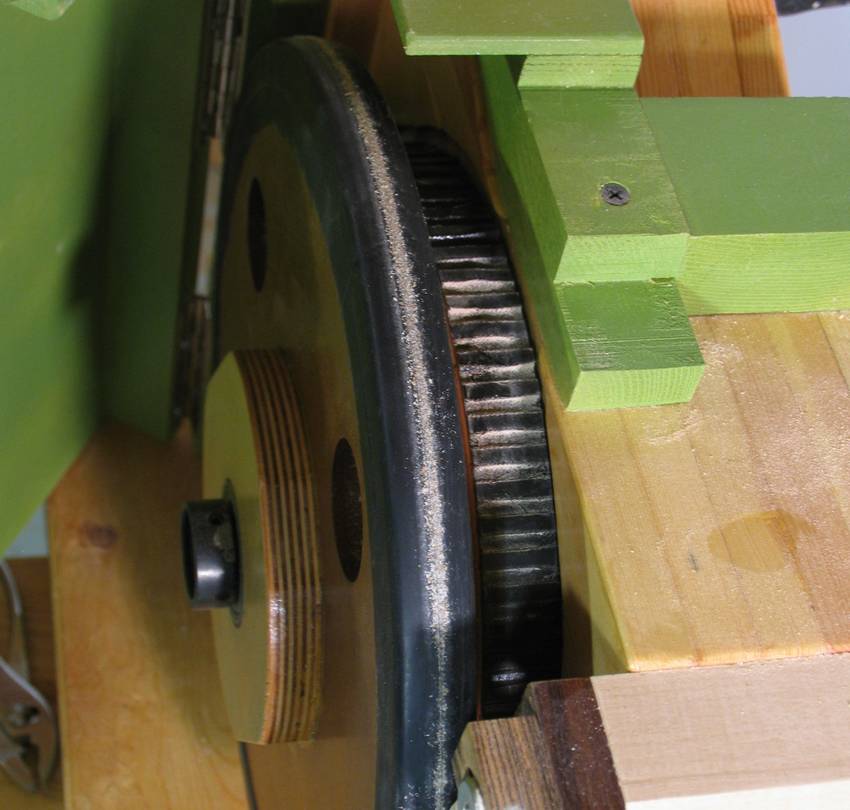
I eventually switched to a V-belt. I used a 2.5" vbelt pulley, and the middle of the three belts in the previous picture. With about a 11" pulley on the wheel, and a 3450 RPM motor, that makes for 550 RPM on the wheels, or about 2040 FPM (about 10.2 meters per second). This is a good speed with a 1 HP motor, though my 16" bandsaw only runs at about 1500 FPM (7.5m/s) because I only have a 1/2 HP motor on it. The drive on the 16" saw has never given me any troubles. So a V-belt is really the way to go, and in the plans for this bandsaw, I'm drawing this as a V-belt.
In terms of blade speed, I really like the slow 1500 FPM of my 16" saw. It runs smooth and quiet, and is good for those detailed cuts. Higher blade speeds are better for resawing, but you need more than 1/2 HP for the motor.
 On my 16" bandsaw, I made wooden trunnions to tilt the table on.
These worked out quite well, but I figured they might be an intimidating
aspect to tackle for some.
On my 16" bandsaw, I made wooden trunnions to tilt the table on.
These worked out quite well, but I figured they might be an intimidating
aspect to tackle for some.
So on this bandsaw I experimented with using hinges for the table mount. The hinges simplified the construction a fair bit.
 A downside of using hinges is that the axis of tilt is now on the bottom
of the table, whereas trunnions allow the table to tilt about an
axis that is level with the top surface. The advantage of using trunnions
is that the slot in the table insert stays aligned with the blade even
as the table is tilted.
A downside of using hinges is that the axis of tilt is now on the bottom
of the table, whereas trunnions allow the table to tilt about an
axis that is level with the top surface. The advantage of using trunnions
is that the slot in the table insert stays aligned with the blade even
as the table is tilted.
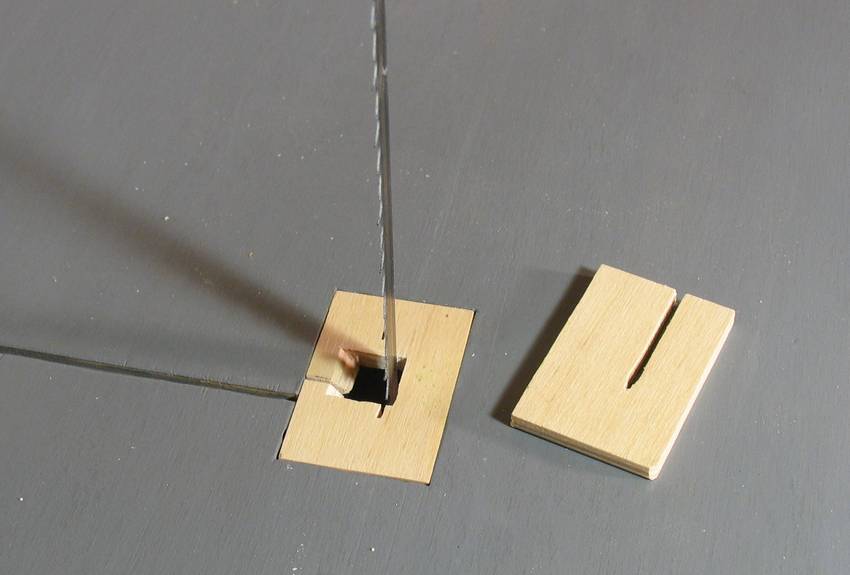
To make an insert that accommodates all tilt angles requires a relatively large hole.
The insert is just a rectangular piece of plywood, so it's easy to make an insert for a specific angle. But then there is the risk of forgetting to remove the insert before tilting the table and damaging the blade.
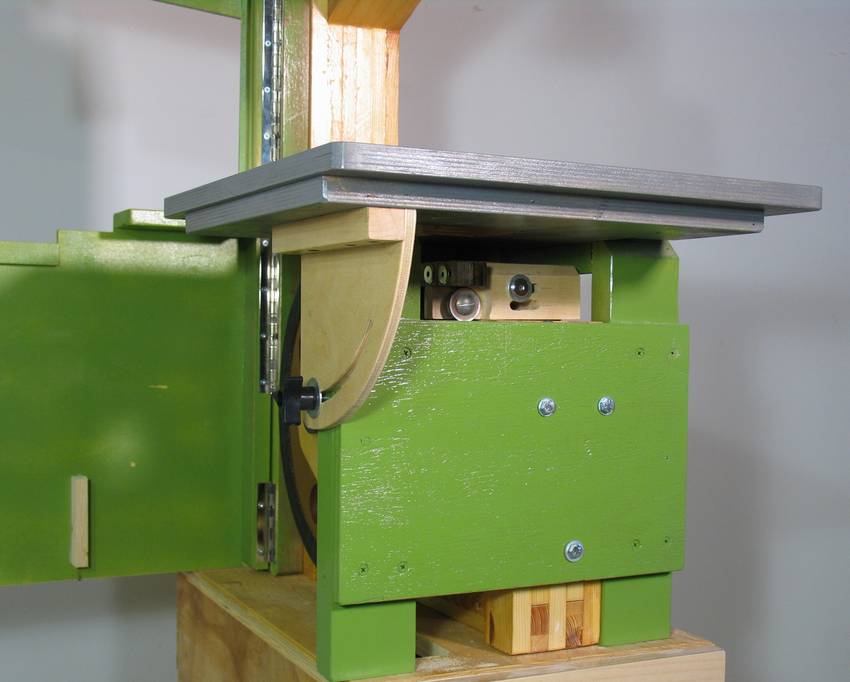 Most bandsaws support the front trunnion with an arm that reaches through between
the wheel, blade, and table. But I wanted this table as low as possible,
and with just 14" wheels, there was not enough room to reach through there.
So the support for the front hinge reaches around the right side, where there
is much more room.
Most bandsaws support the front trunnion with an arm that reaches through between
the wheel, blade, and table. But I wanted this table as low as possible,
and with just 14" wheels, there was not enough room to reach through there.
So the support for the front hinge reaches around the right side, where there
is much more room.
 With the support on the right side, this means the blade must be
inserted from the left side. Inserting the blade
from the left turns out to be no more difficult than doing it from
the right, so that design change worked out well.
With the support on the right side, this means the blade must be
inserted from the left side. Inserting the blade
from the left turns out to be no more difficult than doing it from
the right, so that design change worked out well.
 With the table mounted as low as it can go, and my upper wheel mount
giving more clearance to move the upper beam up a little bit, I was able to
get 30 cm, or almost 12" of resaw height out of this bandsaw.
That's almost as much as a 14" bandsaw with a riser block, but this
14" bandsaw doesn't have the extra height and only uses a regular 93.5" blade.
With the table mounted as low as it can go, and my upper wheel mount
giving more clearance to move the upper beam up a little bit, I was able to
get 30 cm, or almost 12" of resaw height out of this bandsaw.
That's almost as much as a 14" bandsaw with a riser block, but this
14" bandsaw doesn't have the extra height and only uses a regular 93.5" blade.
Even using my improvised upper blade guide trick I was only able to get 9" of resaw capacity out of my 14" saw, so this is quite a bit more than is possible with regular 14" bandsaws.
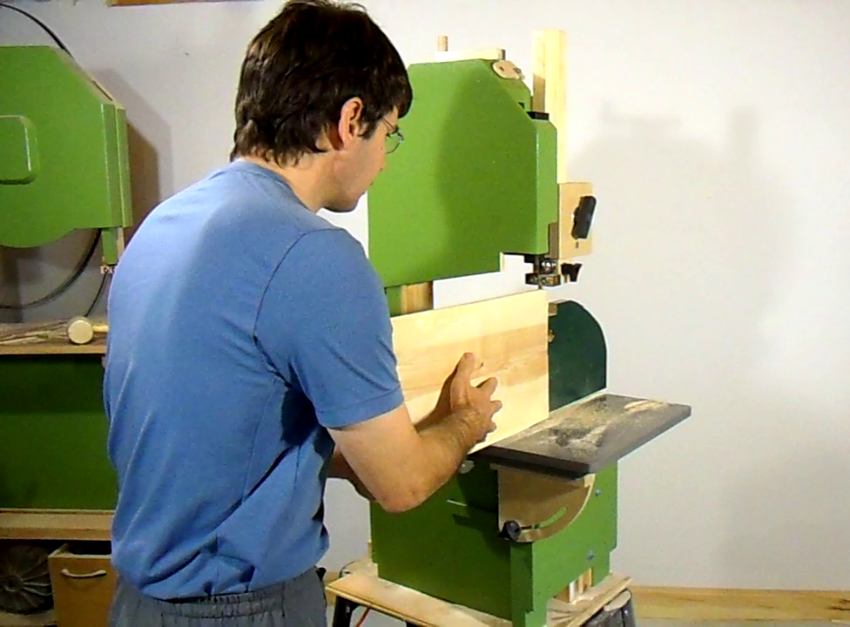 I have sliced up quite a bit of wood with this saw already. Not so much
to make veneer but just to put it through its paces.
I have sliced up quite a bit of wood with this saw already. Not so much
to make veneer but just to put it through its paces.
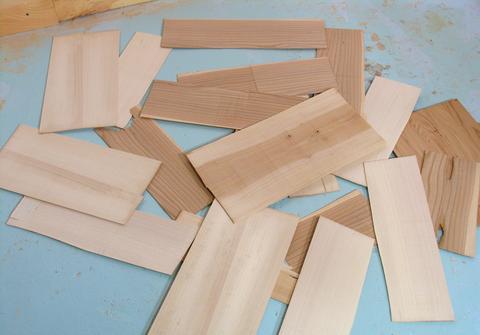 The photo at right unfortunately
doesn't give a sense of scale, but the widest pieces in this photo are 25 cm (10")
wide.
The photo at right unfortunately
doesn't give a sense of scale, but the widest pieces in this photo are 25 cm (10")
wide.
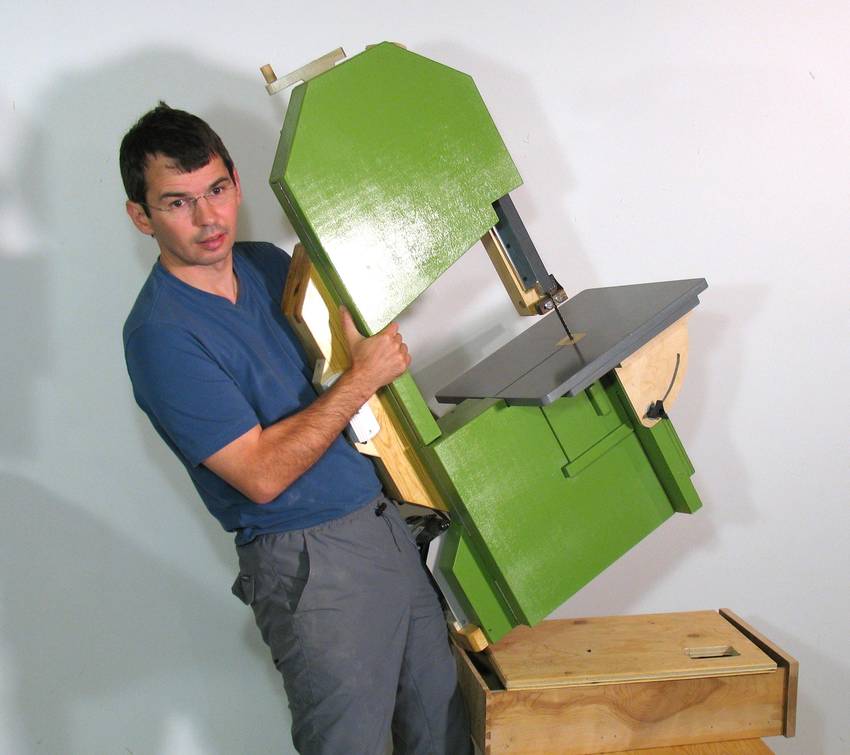
 The saw, including the 1 HP motor weighs 82 pounds, or about 37 kg.
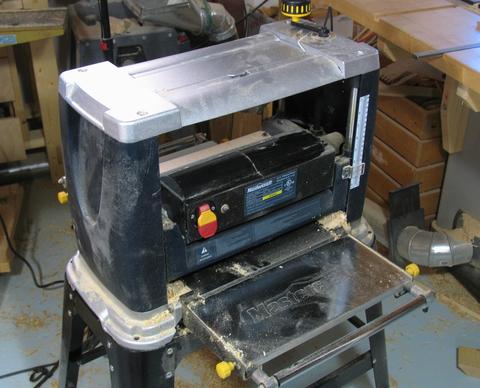
That's a bit of a hefty lift, but it's only 10 pounds more than one of those portable thickness planers (pictured at right) without the stand. So it's still relatively manageable to carry. I made this saw so it would be easy to move around, and could even be used as a benchtop bandsaw.
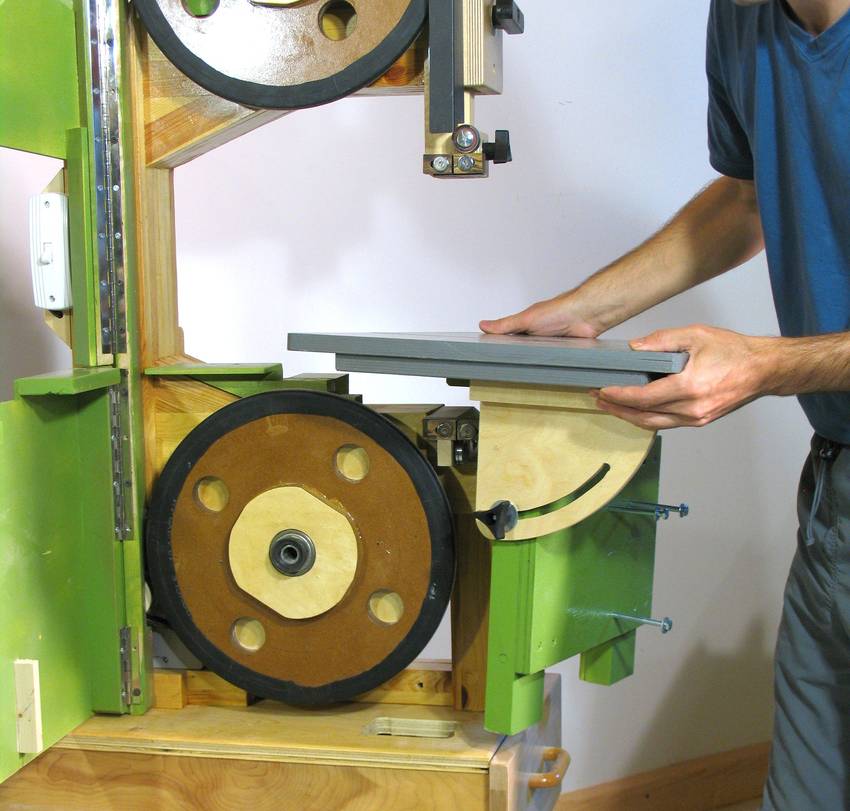 The table can be removed by removing three bolts.
Also relatively easy to remove are the upper blade guide and the whole upper wheel and mount. Without those, the saw is under 60 pounds. Taking the motor off would reduce it by another 18 pounds.
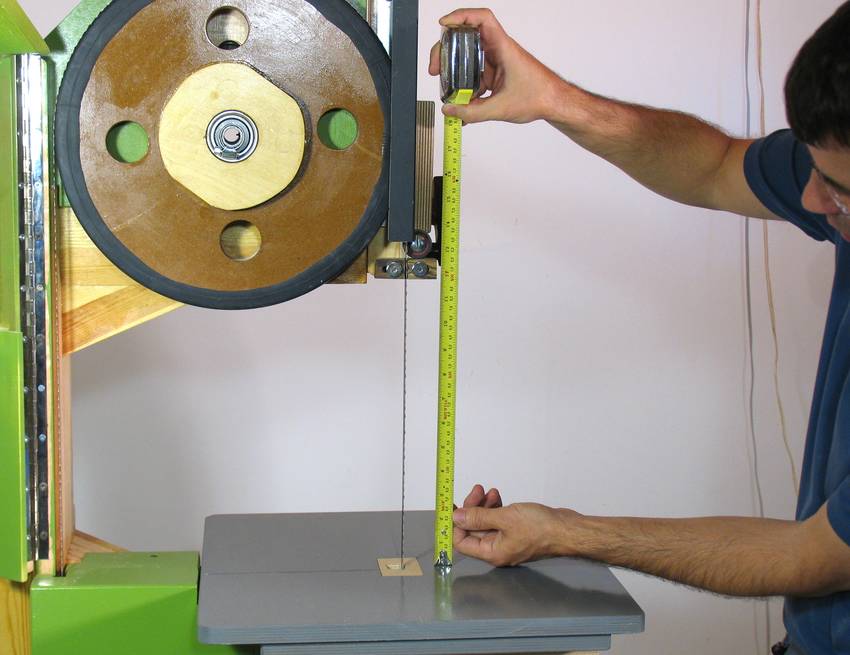
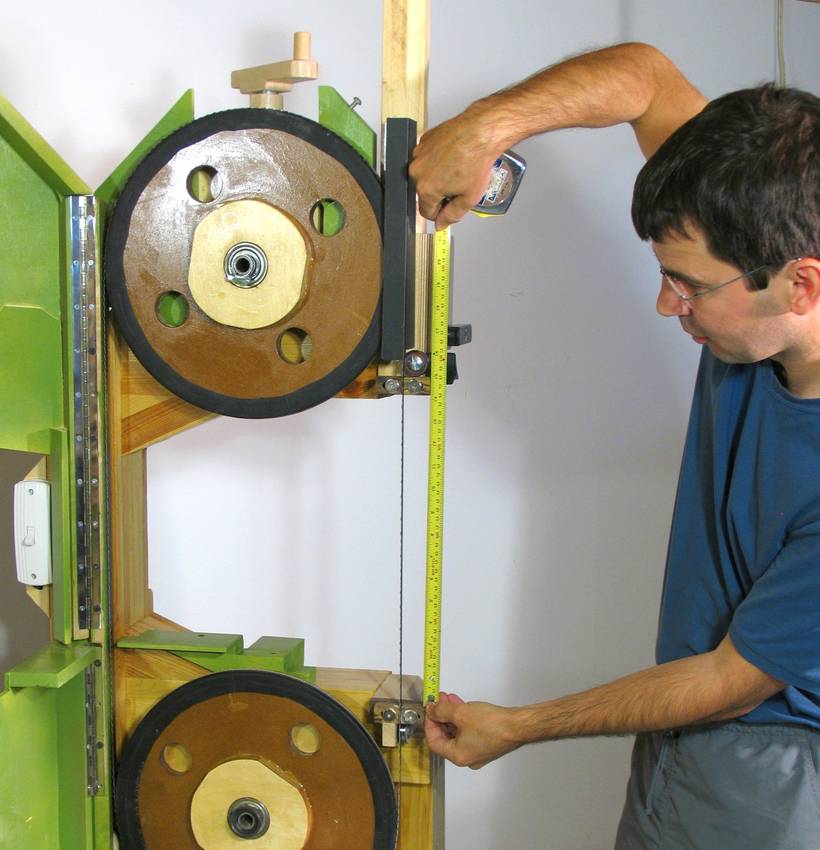 With the table removed and the lower blade guide mounted in its lower position,
the guides are a full 35 cm or 14" apart.
With the table removed and the lower blade guide mounted in its lower position,
the guides are a full 35 cm or 14" apart.
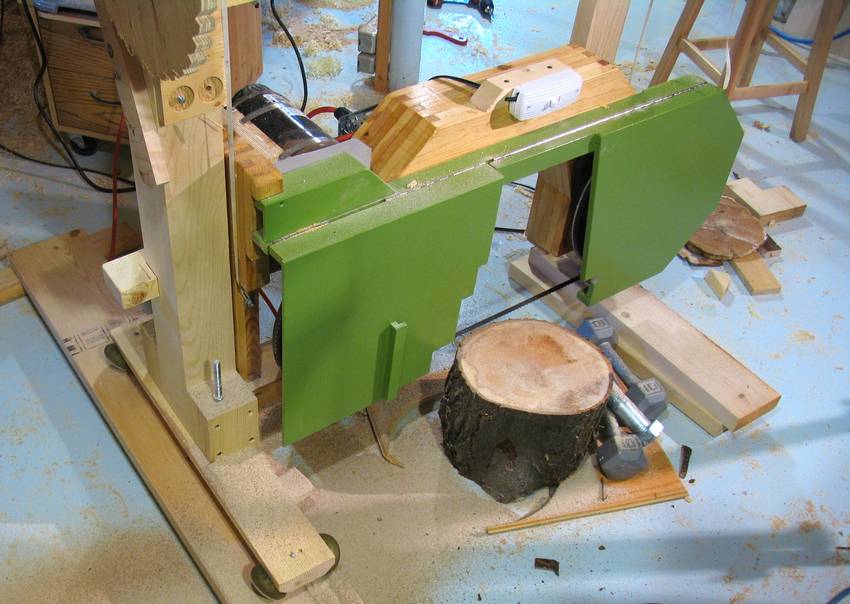 And this finally brings me to one of my main reasons for building this bandsaw:
To experiment with using it as a sawmill for cutting boards straight from logs.
And this finally brings me to one of my main reasons for building this bandsaw:
To experiment with using it as a sawmill for cutting boards straight from logs.
Although in this photo, I sliced the log across, because a neighbour needed some disks cut off the end of a log.
I'm still experimenting with the sawmill aspect of this bandsaw.
Back to the 14" bandsaw build page