Cheap and simple curtain rods
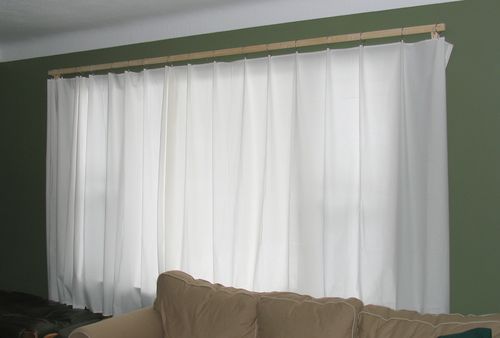
I needed to get some curtain rods for my new place in 2007. I had some fancy ideas about making some nice curtain rods in my workshop, so I didn't want to spend a lot of money getting proper curtain rods if I was going to throw them out eventually. So for the time being, I made some out of simple spruce 1x2 lumber. I was quite happy with this "quick and dirty" result, and neve got around to making fancier ones for that house.
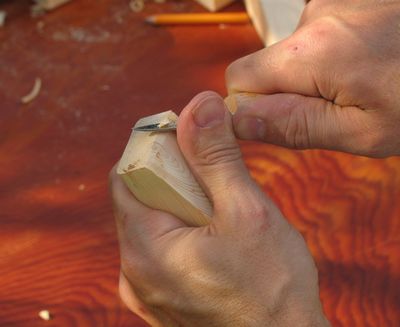
 I decided to plane the edges of the 1x2 (actually .75 x 1.5") a bit. This to make the rings
glide a bit smoother, and also to make them a little bit narrower, so the rings would be less
I decided to plane the edges of the 1x2 (actually .75 x 1.5") a bit. This to make the rings
glide a bit smoother, and also to make them a little bit narrower, so the rings would be less
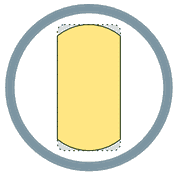 |
The image at right snows the portion planed away of the 1x2 as well as the curtain ring. The rounding is fairly approximate, as I just planed it by hand until it looked like it was that kind of round.
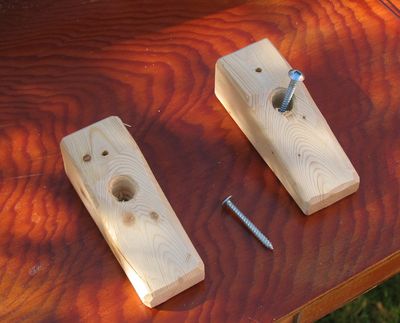 The 1x2 (which is actually .75" x 1.5") is supported by short pieces of 2x2 (actually 1.5"x1.5")
on either end. Because the supports don't stick out too far from the wall, and have a wide
area of contact, they don't actually apply a lot of leverage, so there's no risk
of pulling the drywall anchors out of the wall, even if mounted with just one screw.
The 1x2 (which is actually .75" x 1.5") is supported by short pieces of 2x2 (actually 1.5"x1.5")
on either end. Because the supports don't stick out too far from the wall, and have a wide
area of contact, they don't actually apply a lot of leverage, so there's no risk
of pulling the drywall anchors out of the wall, even if mounted with just one screw.
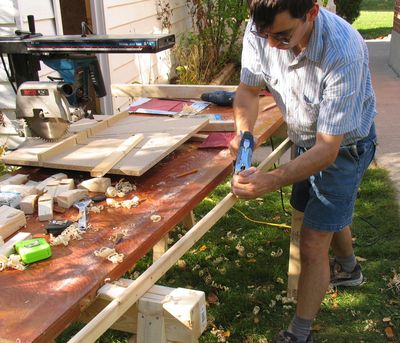
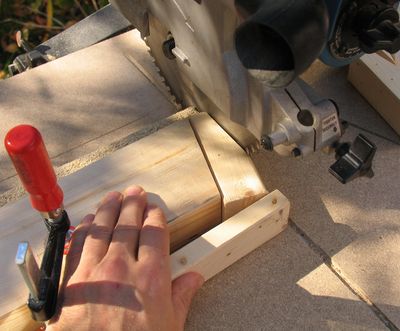 I cut the blocks at an angle using my radial arm saw. Not the ideal tool for the job,
but not yet having set up a workshop, I made do with it.
I cut the blocks at an angle using my radial arm saw. Not the ideal tool for the job,
but not yet having set up a workshop, I made do with it.
Note how I'm using two scrap pieces of wood to jig the piece in place for cutting this angle so that I don't have to get my fingers anywhere near the path of the blade.
My living room window is wider than 8 ft, so had to join two 8-foot 1x2's together to span the width of it. I used a similar technique to cut the 1x2s at an angle for a scarf joint.
 The next step was to cut the edges off the corners with a knife.
It just makes everything look nicer that way.
I also rounded the ends of the rods the same way.
The next step was to cut the edges off the corners with a knife.
It just makes everything look nicer that way.
I also rounded the ends of the rods the same way.
 On mounting it, I made the rod stick out a little bit past the block that holds it.
The last curtain ring goes on the outside side of the block to keep it from
sliding over. That anchors the edge of the curtain at the edge of the window.
Also note a tiny screw sticking out of the top of the curtain rod. It keeps the
last ring from falling off the end.
On mounting it, I made the rod stick out a little bit past the block that holds it.
The last curtain ring goes on the outside side of the block to keep it from
sliding over. That anchors the edge of the curtain at the edge of the window.
Also note a tiny screw sticking out of the top of the curtain rod. It keeps the
last ring from falling off the end.
I put some coats of varnish on the wood to help the rings slide better on the wood. I used some water based floor varnish, which is very slippery. If you made the curtain rods out of hardwood, the rings would slide better even without varnish.
For the curtains themselves, it turned out that bed sheets for a twin sized mattress were just the right width for my windows. I didn't really want something as opaque as regular curtains, so bed sheets were perfect. Though for the master bedroom, facing the street, I layered sheets with 300 thread count to get a bit more opacity.
The curtain rods themselves cost me just $1 in materials each. Another 2x2" to cut up for the mounting
blocks (good for many blocks), and a few screws, and the cost of the curtain rods came to
only $2 per window.
Unfortunately, the curtain rings cost $10 for a set of 7, and I needed two sets per window.
The rings cost as much as the curtains themselves.
That was in 2007. I finally got around to making fancier curtain rods in 2018, one year after we moved to the new place.
See also:
 Skylight installation
 Corner sheelf
 Building a bed loft
 Parallelogram baby gate
 Making coat hooks
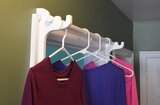 Hooks for hanging coat
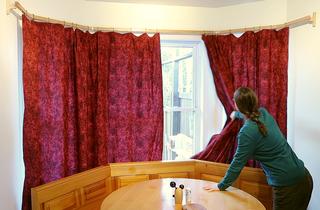 Curtain rod around corners
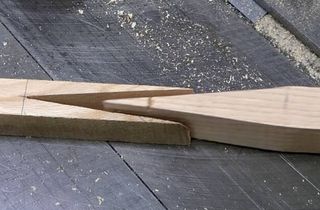 Splicing wood end to make long curtain rods