 It started when a friend mentioned he was replacing his broken
diswasher. I found dish washer motors useful before for building
small dust collector
blowers so I asked him to save the motor for me.
It started when a friend mentioned he was replacing his broken
diswasher. I found dish washer motors useful before for building
small dust collector
blowers so I asked him to save the motor for me.
It started when a friend mentioned he was replacing his broken
diswasher. I found dish washer motors useful before for building
small dust collector
blowers so I asked him to save the motor for me.
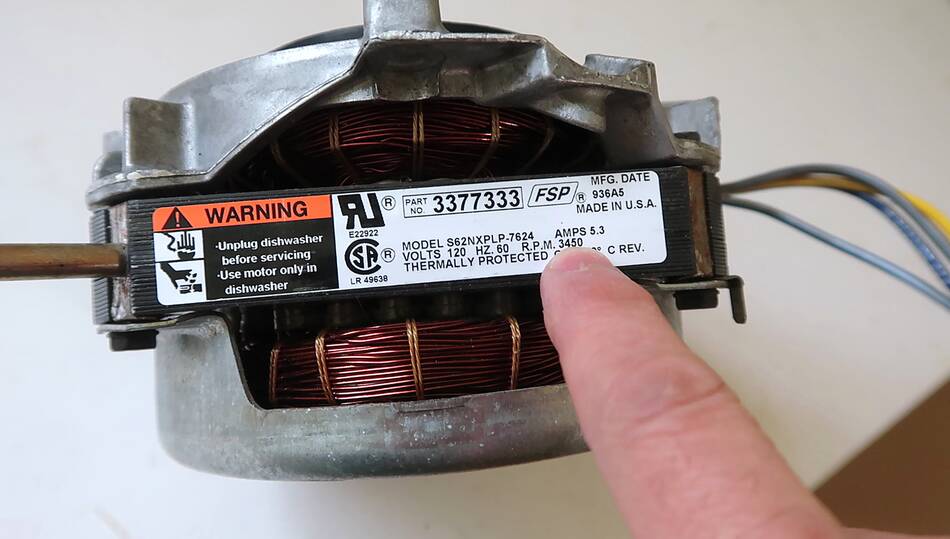
The motor from this one was a bit of a mystery, with just four wires coming out. No capacitor with it and no starting switch built into it.
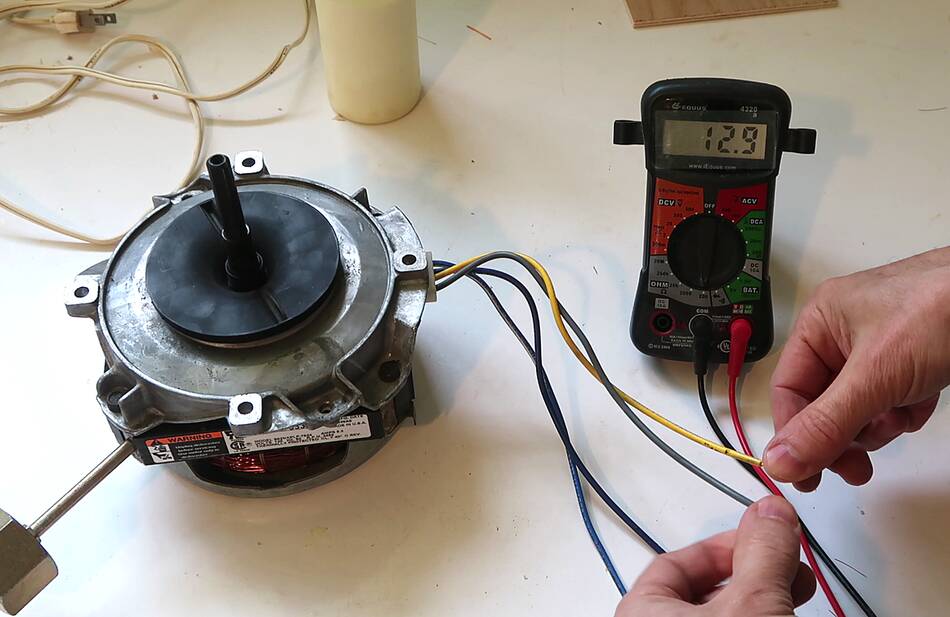 I started by measuring the resistance between each pair of the four wires.
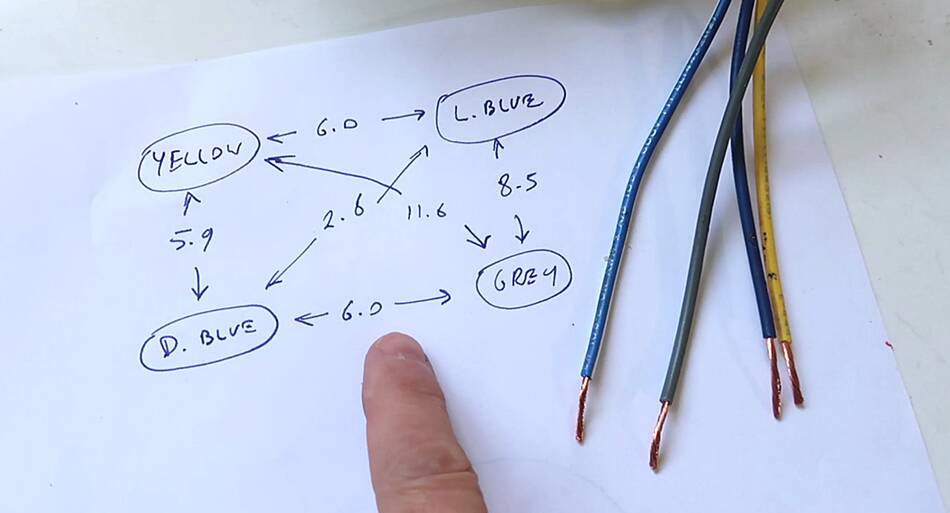 Measurements written out.
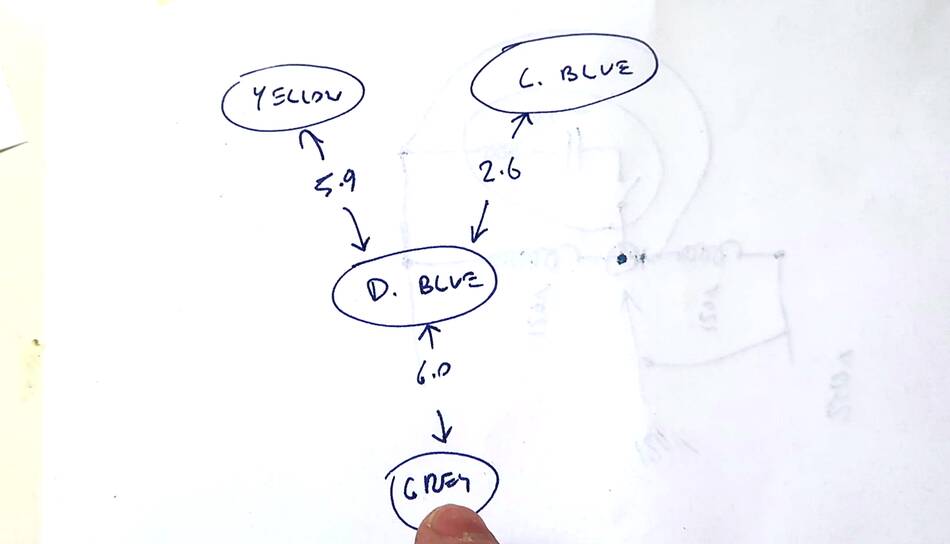 From the measurements I was able to reduce it to this network, with
the dark blue the "common" wire and all the other wires connecting to
common through some sort of winding.
From the measurements I was able to reduce it to this network, with
the dark blue the "common" wire and all the other wires connecting to
common through some sort of winding.
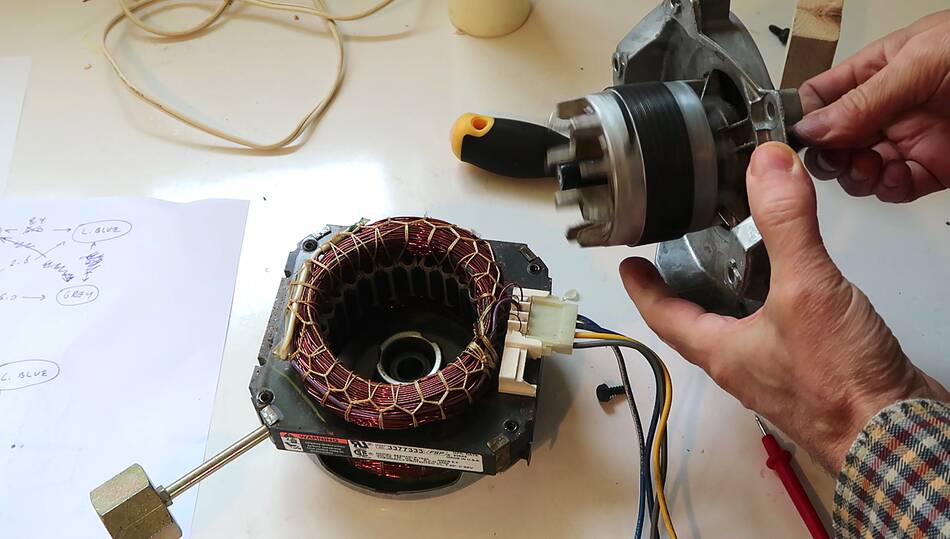 I opened up the motor to have a better look inside, but I couldn't really
identify much of the windings.
I opened up the motor to have a better look inside, but I couldn't really
identify much of the windings.
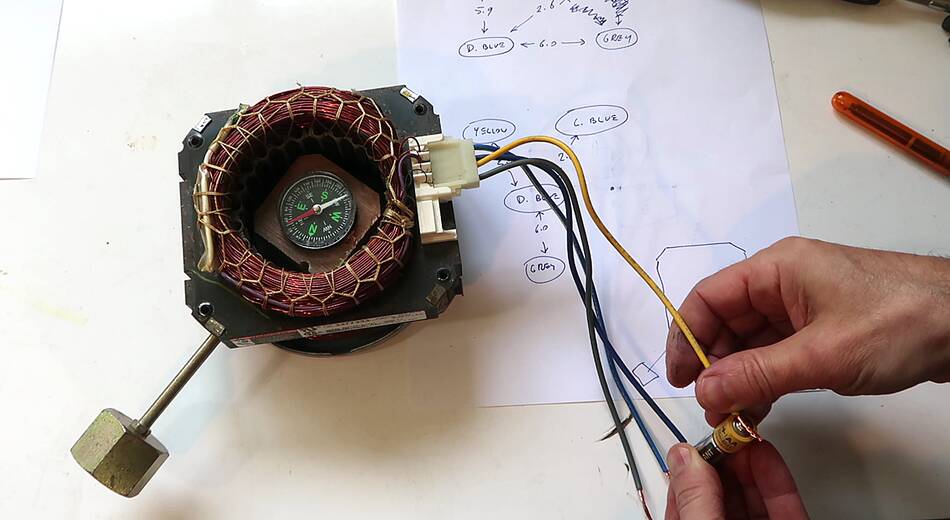 But because this is a two pole induction motor (I know that because it
runs at close to 3600 rpm from 60 Hz mains), I was able to put a compass
into the middle of it to figure out the orientations of the magnetic
fields produced by the windings.
I used an AA battery to activate the windings one at a time and watched
the compass needle move.
But because this is a two pole induction motor (I know that because it
runs at close to 3600 rpm from 60 Hz mains), I was able to put a compass
into the middle of it to figure out the orientations of the magnetic
fields produced by the windings.
I used an AA battery to activate the windings one at a time and watched
the compass needle move.
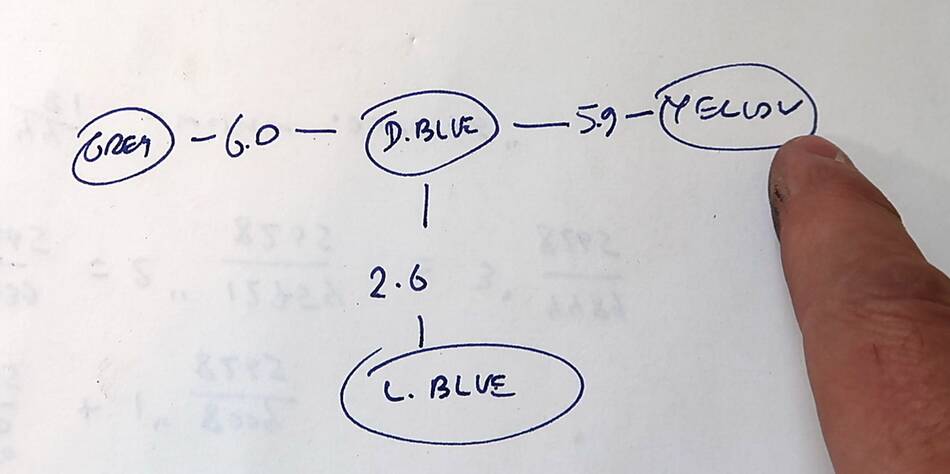 From that I could see that the windings to the yellow and gray leads were opposed
to each other and the light blue, with the lowest resistance was perpendicular
(90 degree phase difference) to the other two.
From that I could see that the windings to the yellow and gray leads were opposed
to each other and the light blue, with the lowest resistance was perpendicular
(90 degree phase difference) to the other two.
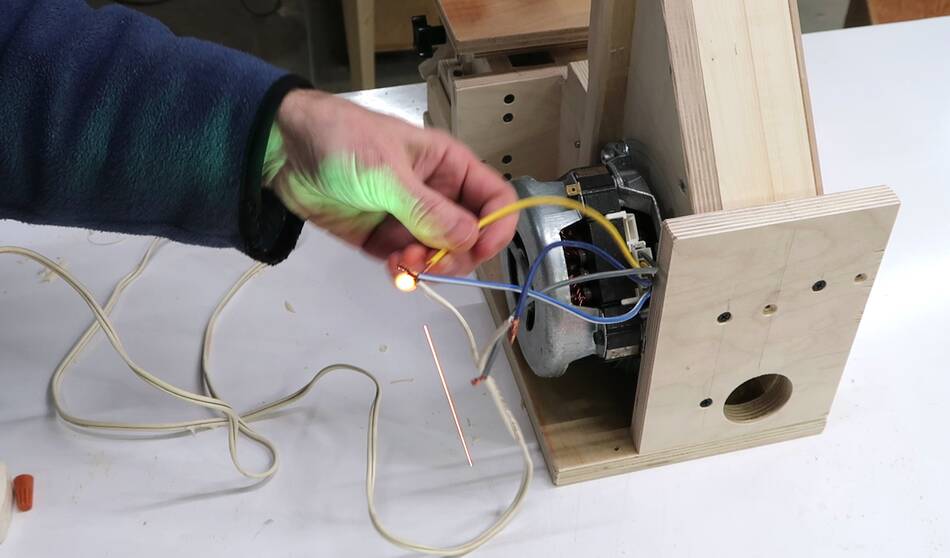
The main winding typically uses much thicker wire so it has less resistance. I connected the dark blue and light blue directly to 120 volt power, then briefly connected yellow to light blue and the motor started up.
From this I was confident that it's a resistance start motor. The starting function of briefly activating the starter winding was probably performed by the diswasher electronics, which I didn't have. So to be usable, this motor needs some sort of starting switch.
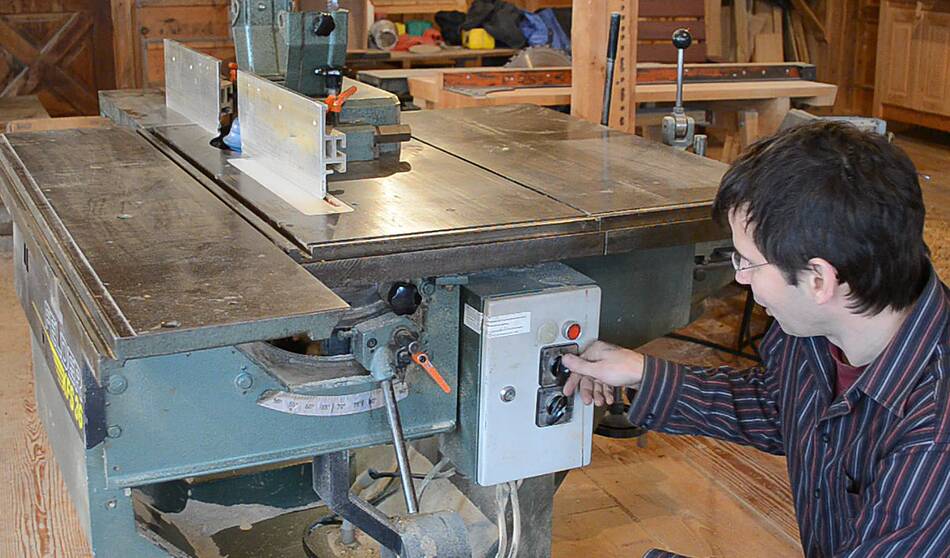 My dad's old Felder table saw
has an interesting way to start the motors without a cetrifugally activated
starting switch on the motors.
It uses split phase motors, but with an extra
large starting capacitor that is engaged while the starting switch is turned.
The starting switch is held in the start position until the saw is up to speed,
then let go to disengage the starting capacitor. A red button disengages
the relay, turning off the motor.
My dad's old Felder table saw
has an interesting way to start the motors without a cetrifugally activated
starting switch on the motors.
It uses split phase motors, but with an extra
large starting capacitor that is engaged while the starting switch is turned.
The starting switch is held in the start position until the saw is up to speed,
then let go to disengage the starting capacitor. A red button disengages
the relay, turning off the motor.
Such a switch and relay combination would be ideal for this motor, but I wouldn't know where to get one like that.
 I built a 1.5"x48" belt sander with this
motor, but this motor doesn't have a built in starting switch, so I had to build
some sort of circuit to solve that problem for me.
I built a 1.5"x48" belt sander with this
motor, but this motor doesn't have a built in starting switch, so I had to build
some sort of circuit to solve that problem for me.
 Disconnecting the starter winding once the motor has spun up sometimes
causes some arcing, but connecting
a 0.47 µf AC capacitor across the contacts cut don on the arcing. I figure
the capacitor should act like a very small capacitor run motor run capacitor,
so if anything, it should help the motor run.
Disconnecting the starter winding once the motor has spun up sometimes
causes some arcing, but connecting
a 0.47 µf AC capacitor across the contacts cut don on the arcing. I figure
the capacitor should act like a very small capacitor run motor run capacitor,
so if anything, it should help the motor run.
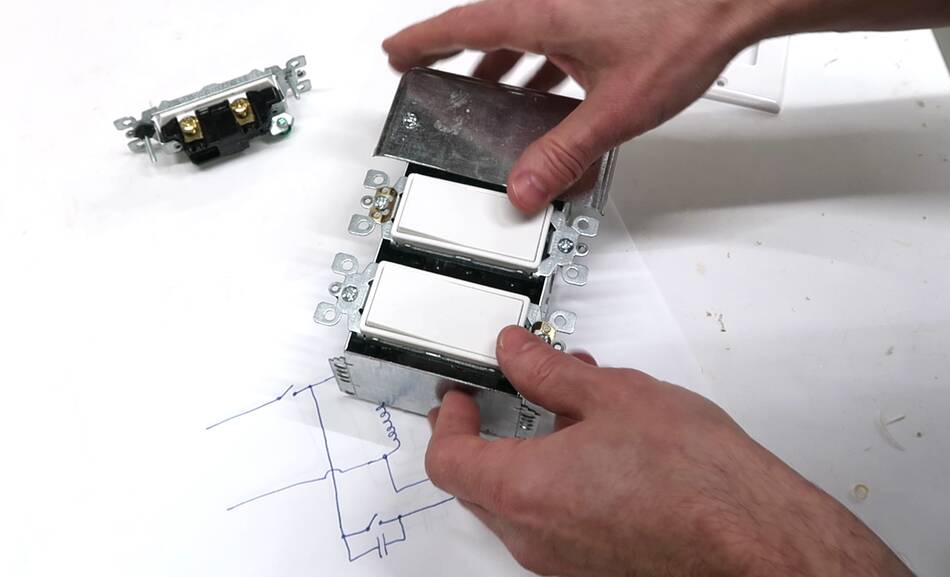 My idea was to use two ordinary light switches for the contacts and build
some sort of "rocker" to go in front of them which would turn both switches
on if pushed to "on", but with a spring to turn the switch with
the starter winding off once the rocker is let go of.
My idea was to use two ordinary light switches for the contacts and build
some sort of "rocker" to go in front of them which would turn both switches
on if pushed to "on", but with a spring to turn the switch with
the starter winding off once the rocker is let go of.
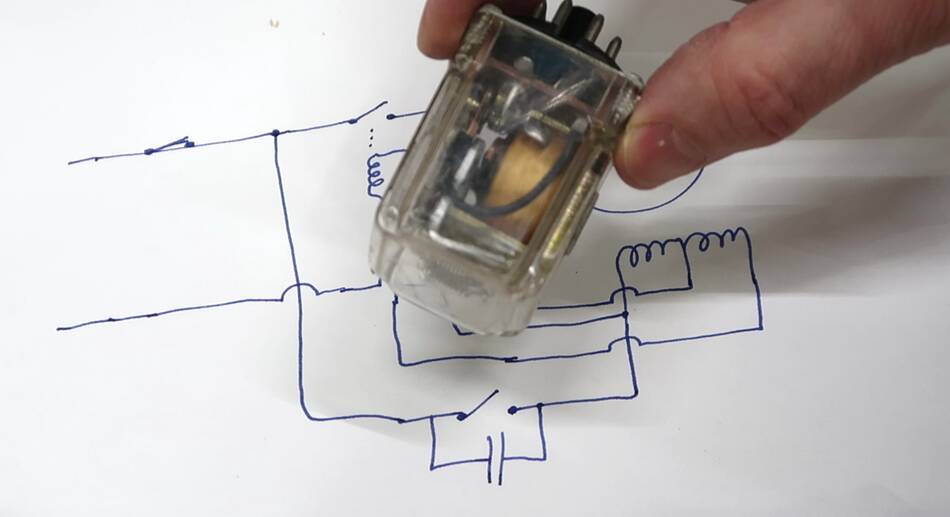 But then I had the idea of making a sort of NVR (no voltage reset)
switch using a relay. I found this relay with a 120 volt AC coil in my
collection of relays that was suitable.
But then I had the idea of making a sort of NVR (no voltage reset)
switch using a relay. I found this relay with a 120 volt AC coil in my
collection of relays that was suitable.
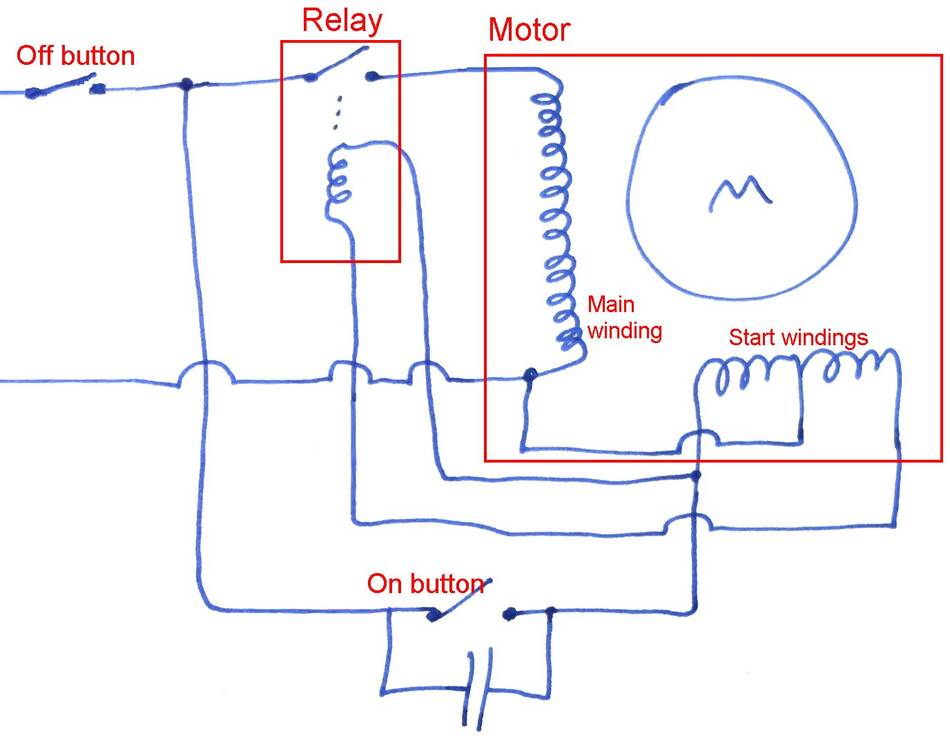 This is the circuit I came up with, based on having just a SPST relay and two
temporary switches each with just one pole.
This is the circuit I came up with, based on having just a SPST relay and two
temporary switches each with just one pole.
The relay is connected across the two start windings. The on button sends power to one side of the start winding. This in turn activates the relay to turn on the main winding. The "on button" is held down until the motor is up to speed, then released. While the motor is running, about 40 volts are induced across each of the starter windings. I had to connect across both of them to get enough voltage to keep the relay closed.
briefly interrupted power using the "off" button disengages the relay and stops the motor.
 I needed a temporary on switch to turn on, and a temporary interrupter
switch to turn it off. Again, nothing suitable on line.
I needed a temporary on switch to turn on, and a temporary interrupter
switch to turn it off. Again, nothing suitable on line.
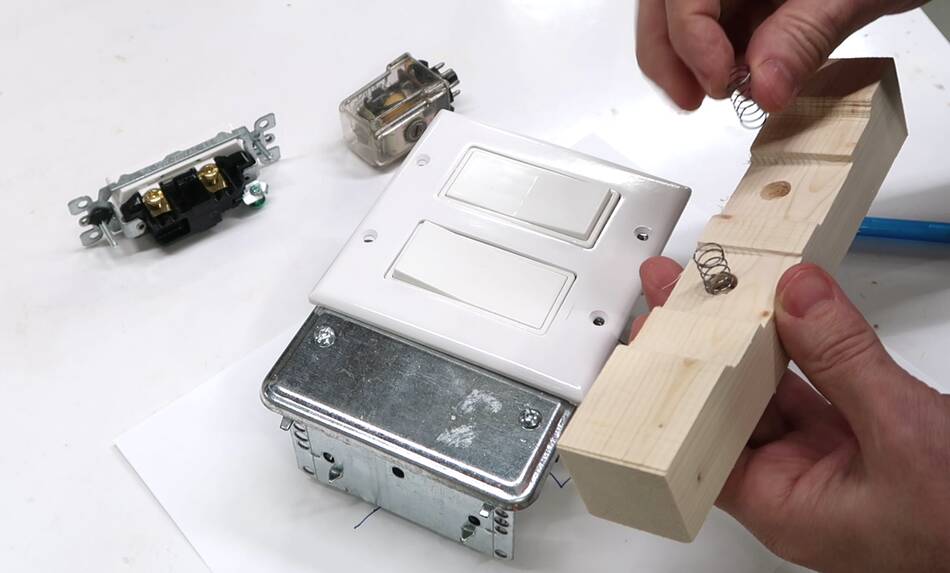
But I had the idea of just mounting a bar across the bottom half of the switches with springs in the bar to automatically switch the switch back off once let go.
Mounting one of the switches upside-down makes it a temporary off switch.
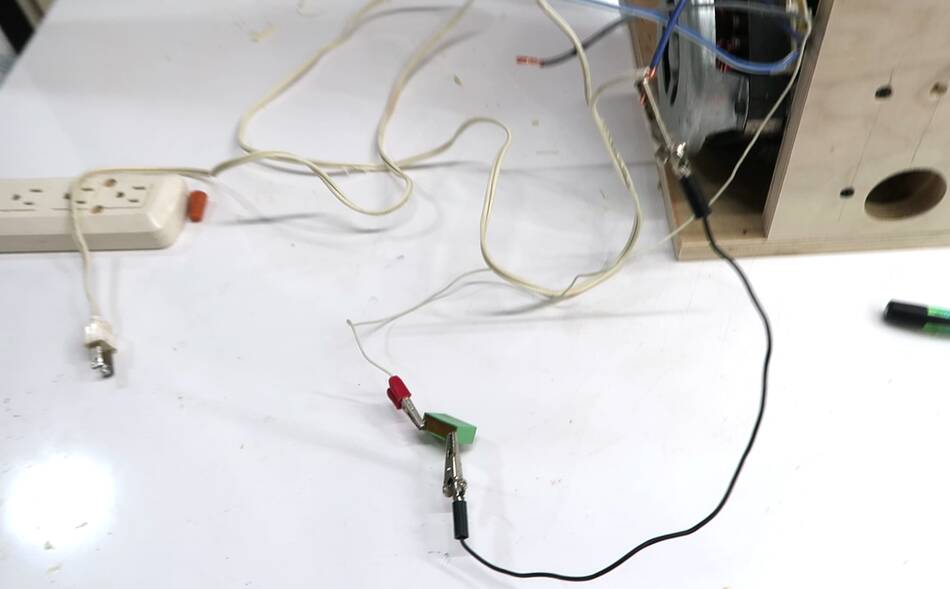
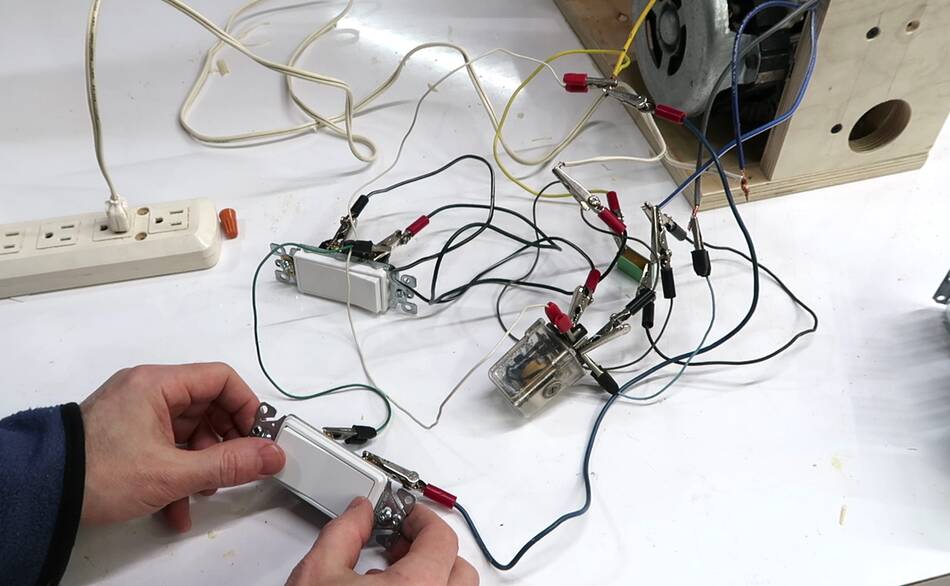 Prototyping the circuit with clip leads. A rather precarious arrangement.
But I was more worried about causing an accidental short circuit than getting
zapped.
Prototyping the circuit with clip leads. A rather precarious arrangement.
But I was more worried about causing an accidental short circuit than getting
zapped.
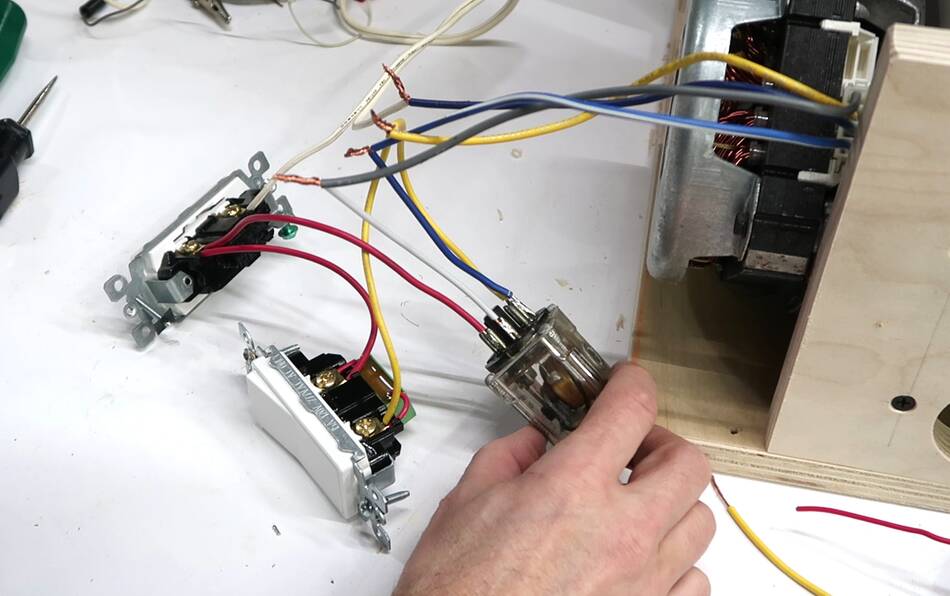 Having established that it worked, I soldered short wires to the relay pins.
The small capacitor is directly on the back of one of the switches.
Having established that it worked, I soldered short wires to the relay pins.
The small capacitor is directly on the back of one of the switches.
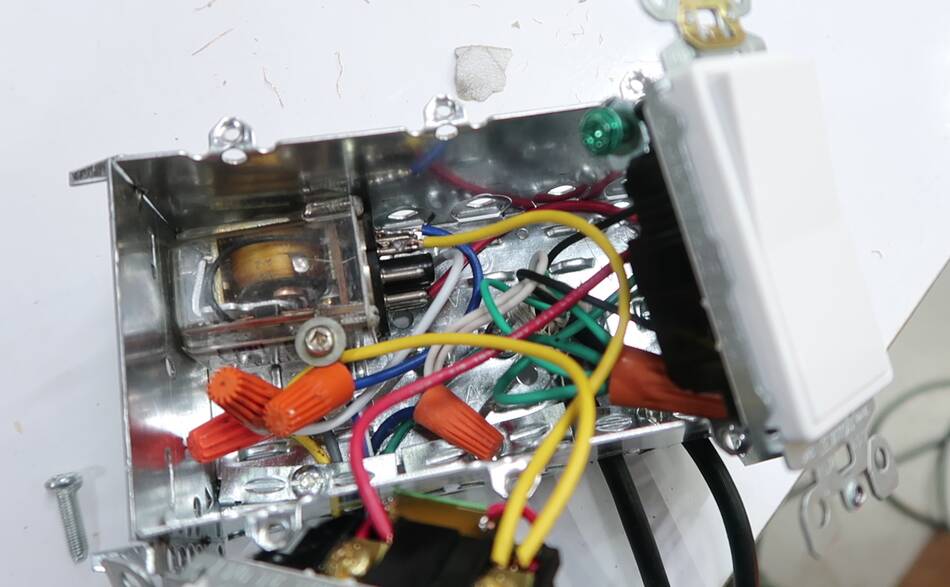 Then jamming everything into an electrical box. I made sure the ground
is connected!
Then jamming everything into an electrical box. I made sure the ground
is connected!
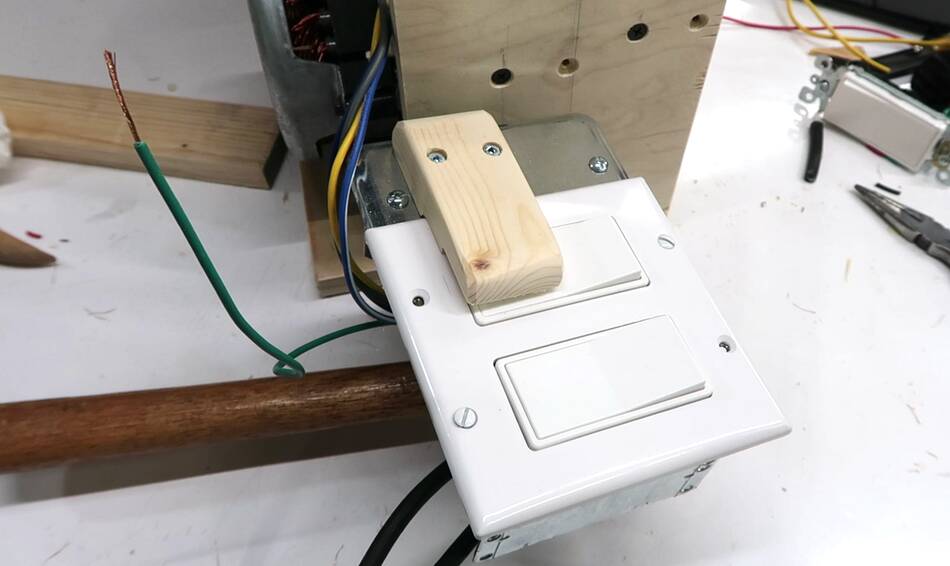 But before I was done, I had a change of mind about how this would work.
I decided the "off" switch should not be "temporary", so if the relay were to
fail closed (contacts welding shut -- happens sometimes), I can still switch
the machine off. I figured this would be a safer arrangement.
But before I was done, I had a change of mind about how this would work.
I decided the "off" switch should not be "temporary", so if the relay were to
fail closed (contacts welding shut -- happens sometimes), I can still switch
the machine off. I figured this would be a safer arrangement.
Also on my homemade sanders I always have an extra socket connected to the main switch so that a small dust collector automatically turns on when I turn on the sander. The extra socket is directly connected to the main switch, which means less current for the relay to switch.
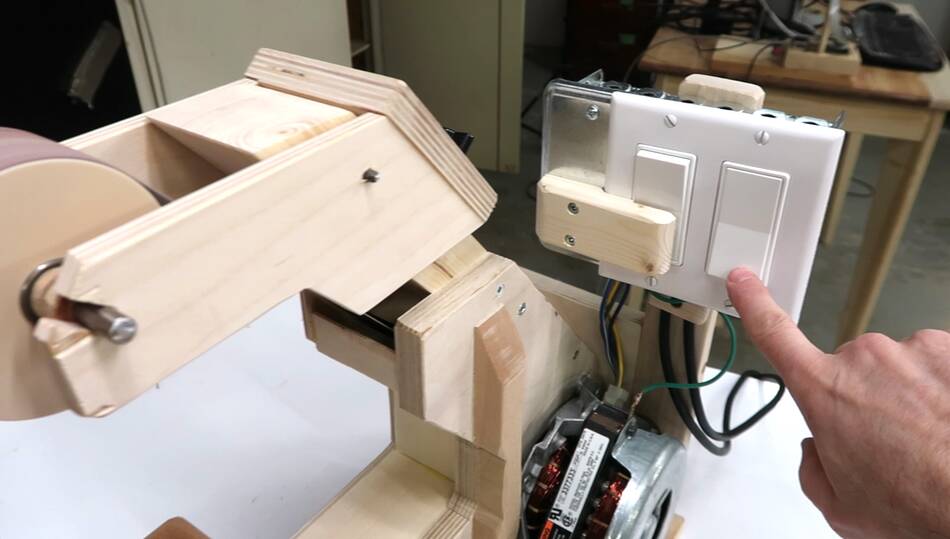 The way the switch is operated, I can just push both switches up to start
the sander. When I'm done, I just flick the right switch down again.
The way the switch is operated, I can just push both switches up to start
the sander. When I'm done, I just flick the right switch down again.
Or I can flick the right switch on without pushing the switch on the left to only turn on the dust collector. The sander won't run until I temporarily push the starter switch on the left. I need to hold that switch down for about half a second for the sander to come up to speed. If I just tap it, it doesn't get enough speed for the starter windings to produce enough voltage to keep the relay switched on.
Another way would be to build an electronic delay to automatically engage the starter winding for a short time, such as this one by the "post apocalyptic inventor". But it's a tricky thing. If an automatic starter circuit ever fails and leaves the starter winding on, it burns out the motor. And if it fails to engage the starter winding, that also burns it out. So I prefer something more manually engaged so I'll notice if it doesn't work right and can turn it off before the motor burns out.
 dish washer wet rotor synchronous motor
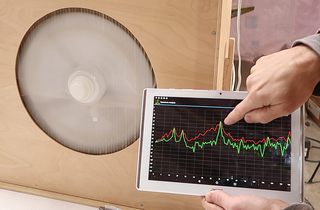 Measuring RPM with a spectrum analyzer app (video only)
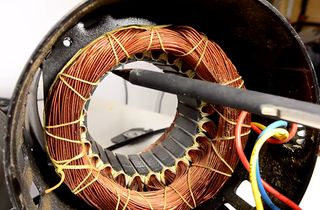 Reversing single phase induction motors
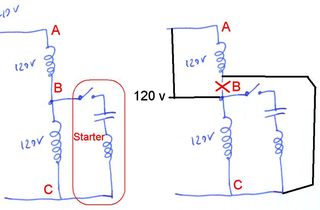 Rewiring a motor from 240 and 120 volts
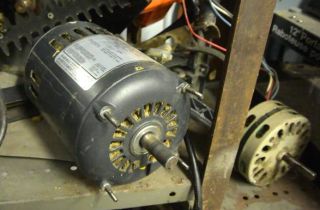 Where do you get your motors from?
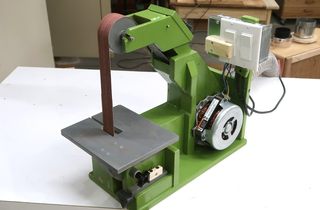 1.5x48" belt sander build
 Building a dust collector blower
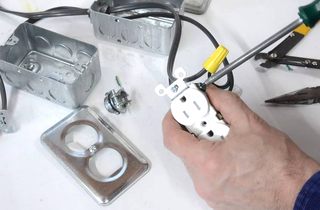 Making a simple remote switch
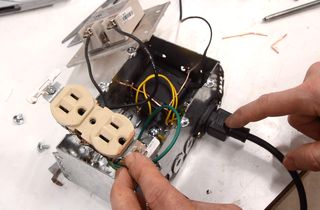 Relay box to turn on dust collector automatically
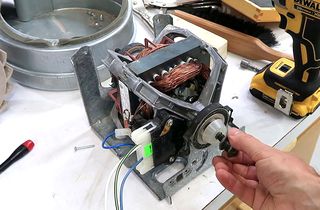 Wiring up and reusing a clothes dryer motor